
NVIDIA NIM
Integrating NVIDIA NIM LLMs into Dataiku allows you to leverage high-performance inference for both hosted and self-hosted models. This capability is enabled via the NVIDIA NIM plugin, which provides both the LLM Mesh connectivity and management tools for Kubernetes-based deployments.
Capabilities
NVIDIA NIM integration provides three primary features to your Dataiku instance:
Dataiku LLM Mesh Connection - Connect to NVIDIA NIM models for chat completion and embeddings
NIM Deployment Macro - Deploy and manage NIMs on Kubernetes clusters
NemoGuard NIMs Guardrails - Apply content safety, topic control, and jailbreak detection
Dataiku LLM Mesh Connection
A specialized LLM Mesh connection with:
Access to NVIDIA NIM Text/Multimodal Chat Completion and Embedding models via the Dataiku LLM Mesh.
Support for streaming and tool calling for compatible NIM models.
This connection is infrastructure-agnostic; models can be hosted in the NVIDIA Cloud, self-hosted using the provided deployment macro, or managed on external infrastructure. To create the connection, navigate to Administration > Connections > New Connection > NVIDIA NIM.
Note
For embedding models that require an input_type parameter: You can pass it as a suffix to the model identifier (e.g., NV-Embed-QA-query or NV-Embed-QA-passage).
NIM Deployment Macro
For teams self-hosting on Kubernetes, the NIM Deployment Macro is available to manage the underlying infrastructure directly from Dataiku:
Deploy, list, and remove the NVIDIA GPU Operator and NIM Operator.
Deploy, list, and remove NVIDIA NIM Services.
Note
Using the macro to deploy the GPU and NIM Operators is optional. In many environments, it may be preferable to manage these operators externally (e.g., via the OpenShift OperatorHub) before connecting them to Dataiku.
Prerequisites
Dataiku >= v14.2.0
An NVIDIA AI Enterprise license.
The NVIDIA NIM Plugin installed from the Dataiku Plugin Store.
NIM Container Registry and NIM Model Repository credentials (these can be an NVIDIA Authentication API Key if using NGC).
- An attached Kubernetes cluster with:
An auto-provisioning Storage Class that supports “ReadWriteMany” access mode (see NIM Operator docs).
(Optional) The Prometheus operator installed on the cluster, required if leveraging horizontal pod autoscaling.
(Optional) The Nginx ingress controller installed on the cluster; without this, the deployment macro defaults to exposing the NIM Services using a NodePort Kubernetes service.
Plugin Configuration
To begin, install the NVIDIA NIM plugin (see the plugin installation guide). Once installed, configure the necessary credentials via Plugin Presets.
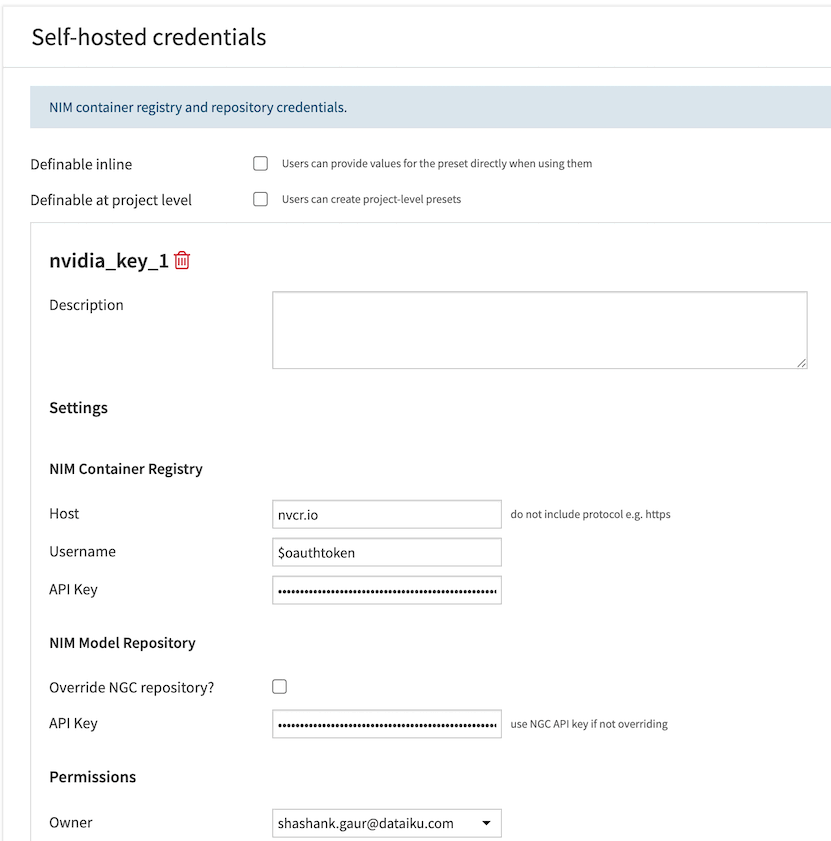
Self-hosted Credentials
This preset stores the NIM Container Registry and NIM Model Repository credentials required when self-hosting NIMs on an attached Kubernetes cluster using the NIM Deployment Macro.
Navigate to Plugins > Installed > NVIDIA NIM Plugin > Settings > Self-hosted credentials > Add a Preset.
For the Docker container registry, enter the host, username, and API key.
- For the NIM model registry:
If using NGC, simply enter your NGC API key.
If using an alternative model registry (such as JFrog), select the override model registry checkbox and enter the model registry host, protocol, and API key.
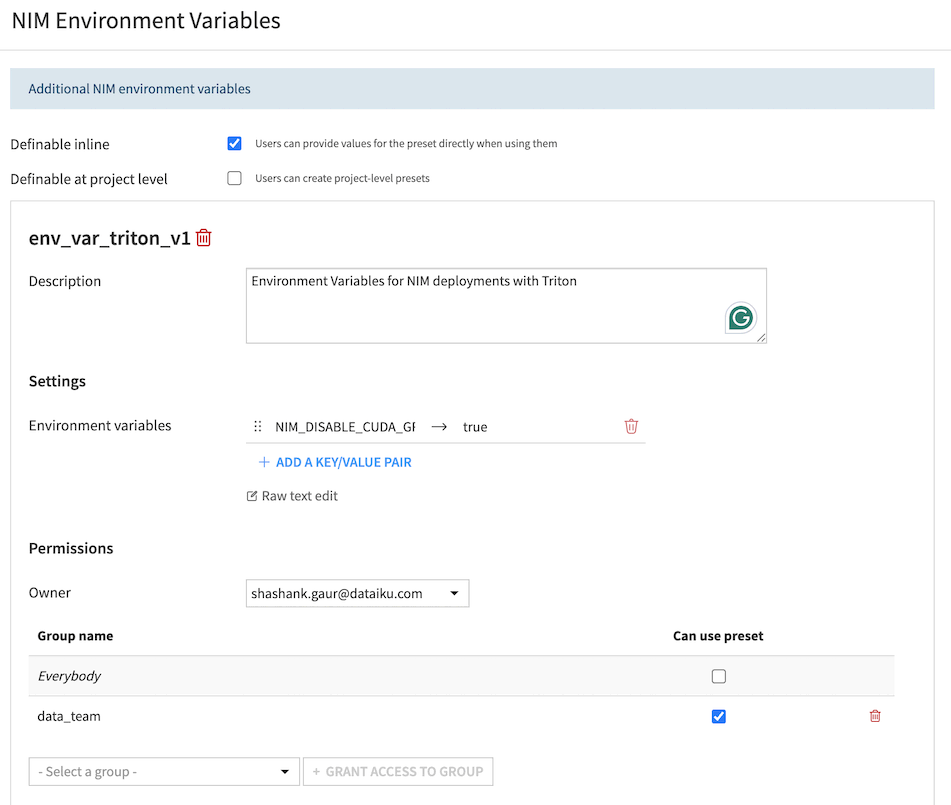
NIM Environment Variables
This preset provides a mechanism to override the values of NIM environment variables. It should only be used when self-hosting NIMs on an attached Kubernetes cluster using the NIM Deployment Macro.
Navigate to Plugins > Installed > NVIDIA NIM Plugin > Settings > NIM Environment Variables > Add a Preset.
Use this to override the value of any standard NIM environment variable.
Deploying NIM Services
If you are self-hosting, the NIM deployment macro is located in the Administration > Clusters > [Cluster Name] > Actions tab of the Kubernetes cluster.
GPU and NIM Operators
The macro provide the option to list, deploy, and remove the NVIDIA NIM Operator & GPU Operator. If these Operators are not already available on the cluster, you must deploy them prior to deploying your first NIM Service.
NIM Services
The macro provides the option to list, deploy, and remove NVIDIA NIM Services. Under the hood, Dataiku leverages the NVIDIA NIM Operator, so all options presented in the UI correspond to those described in the NIM Operator documentation.
NemoGuard NIMs Guardrails
The NemoGuard NIMs Guardrails component provides content safety, topic control, and jailbreak detection capabilities powered by NVIDIA NemoGuard microservices. Apply these guardrails to LLM conversations to detect and prevent unsafe, off-topic, or malicious content.
Guardrail Types
Topic Control
Analyzes the full conversation context to ensure discussions remain within approved boundaries (e.g. product domain for a customer service chatbot). The guardrail sends the complete message history to the NemoGuard Topic Control NIM, which determines if the conversation is on-topic. Learn more.
Content Safety
Checks both user queries and model responses for unsafe content including violence, hate speech, sexual content, and harassment. The guardrail analyzes the last user message and (if present) the assistant’s response. Learn more.
Jailbreak Detection
Identifies prompt injection attacks and attempts to manipulate the AI system. Only operates on user queries (the last message in the conversation). Learn more.
Configuration
The configuration process depends on the type of guardrail.
For Topic Control and Content Safety
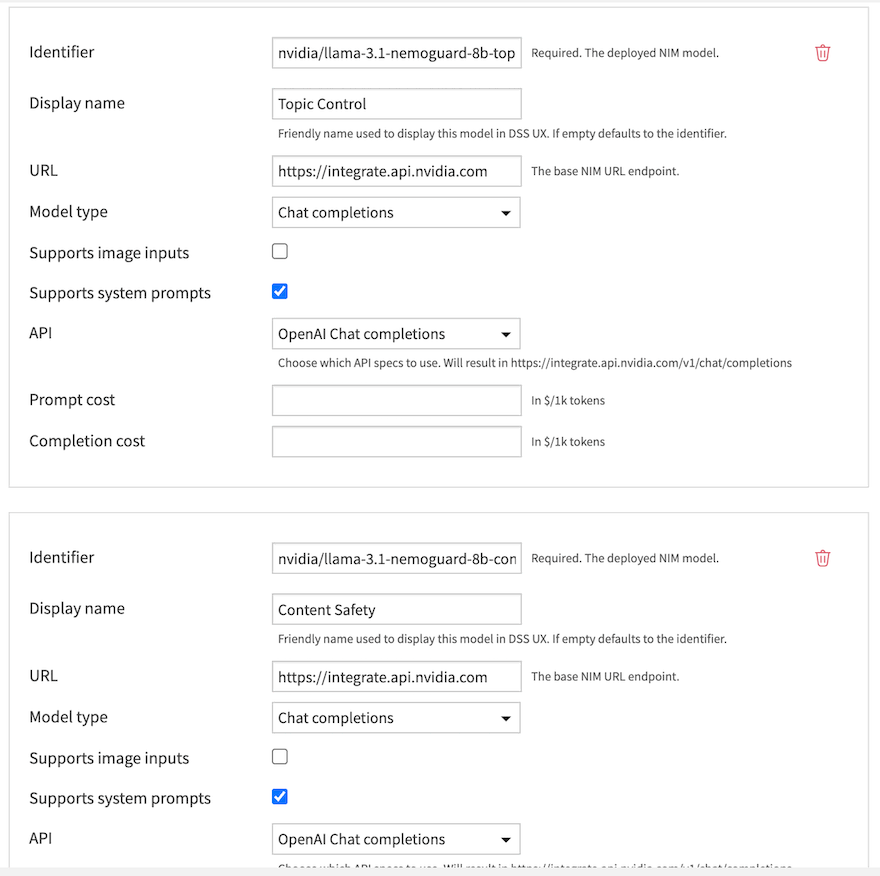
These guardrails use standard NIM models that must first be added to an NVIDIA NIM connection in the LLM Mesh.
Add the Guardrail Model to a Connection: Navigate to Administration > Connections and either create a new NVIDIA NIM connection or edit an existing one. Add the Topic Control or Content Safety model to this connection.
Add the Guardrail to an LLM: Go to the LLM you want to protect (in the same or a different connection) and navigate to the Guardrails tab.
Configure the Guardrail:
Click Add Guardrail and select Nemo Guardrails NIMs.
NIM Guardrail: Choose Topic Control or Content Safety, then specify the NVIDIA NIM Connection with the guardrail model, the model and the action to take (Reject, Audit, or Decline).
For Jailbreak Detection
The Jailbreak Detection guardrail uses a model that is not exposed via a standard OpenAI-compatible API. Therefore, its endpoint must be configured directly within the guardrail settings.
Create an Authentication Connection: Ensure you have an NVIDIA NIM connection configured in Dataiku. This connection will be used to authenticate requests to the jailbreak model endpoint, but the model itself is not added to this connection.
Add the Guardrail to an LLM: Go to the LLM you want to protect and navigate to the Guardrails tab.
Configure the Guardrail:
Click Add Guardrail and select Nemo Guardrails NIMs.
NIM Guardrail: Choose Jailbreak Protection.
NVIDIA NIM Connection: Select the connection to use for authentication.
Model Endpoint: Enter the full endpoint URL for the Jailbreak Detection NIM.
Action to take: Define the desired behavior.

Usage
Once configured, guardrails automatically evaluate:
Queries: Before they are sent to the LLM
Responses: After the LLM generates a response (optional, configured via “Operate on responses”)
Guardrails process the full conversation context, allowing NemoGuard NIMs to make informed decisions based on the entire dialogue history.
Case Study: Scaling Generative AI in Financial Services

Learn how the Dataiku and NVIDIA partnership is enabling financial services institutions to scale generative AI: