
Exposing a Python prediction model
In addition to standard models trained using the DSS Machine Learning component, the API node can also expose custom models written in Python by the user.
To write a “custom Python prediction” endpoint in an API node service, you must write a Python class that implements a predict method.
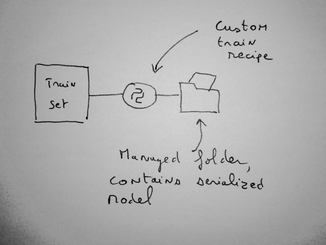
The custom model can optionally use a DSS managed folder. This managed folder is typically used to store the serialized version of the model. The code for the custom model is written in the “API service” part DSS.
Creating the Python prediction endpoint
To create a Python Prediction endpoint, start by creating an API service from the API Designer.
Go to the project homepage
Go to the API Designer and create a new service
Give an identifier to your API Service. This identifier will appear in the URL used to query the API
At this point, the API Service is created but not yet have any endpoint, i.e. it does not yet expose any capability. See Concepts for what endpoints are.
Create a new endpoint of type “Python Prediction”. Give an identifier to the endpoint. A service can contain multiple endpoints (to manage several models at once, or perform different functions)
You will need to indicate whether you want to create a Regression (predicting a continuous value) or a Classification (predicting a discrete value) model.
The URL to query the API will be like /public/api/v1/<service_id>/<endpoint_id>/predict.
Validate, you are taken to the newly created API Service in the API Designer component.
DSS prefills the Code part with a sample depending on the selected model type.
Using a managed folder
A custom model can optionally (but most of the time) use a DSS managed folder. When you package your service, the contents of the folder is bundled with the package, and your custom code receives the path to the managed folder content.
A typical usage is when you have a custom train recipe that dumps the serialized model into a folder. Your custom prediction code then uses this managed folder.
Structure of the code
To create a custom model, you need to write a single Python class. This class must extend dataiku.apinode.predict.predictor.ClassificationPredictor or dataiku.apinode.predict.predictor.RegressionPredictor. The name of the class does not matter. DSS will automatically find your class.
The constructor of the class receives the path to the managed folder, if any.
Regression
A regression predictor must implement a single method: def predict(self, features_df)
This method receives a Pandas Dataframe of the input features. It must output one of the following forms:
prediction_series(prediction_series, custom_keys_list)
Answer details:
prediction_series(mandatory): a Pandas Series of the predicted values. The output series must have the same number of rows as the input dataframe. If the model does not predict a row, it can leavenumpy.nanin the output series.custom_keys_list(optional, may be None): a Python list of dictionaries for each input row. Each list entry contains a dict of the customKeys that will be sent in the output (freely usable.)
The predict method must be able to predict multiple rows.
Classification
A classification predictor must implement a single method: def predict(self, features_df)
This method receives a Panda Dataframe of the input features.
It must output one of the following forms:
prediction_series
(prediction_series, probas_df)
(prediction_series, probas_df, custom_keys_list)
Answer details:
prediction_series(mandatory): a Pandas Series of the predicted values. The output series must have the same number of rows as the input dataframe. If the model does not predict a row, it can leaveNonein the output series.probas_df(optional, may be None): a Pandas Dataframe of the predicted probas. Must have one column per class, and the same number of rows as the input dataframe. If the model does not predict a row, it must leavenumpy.nanin the probas dataframe.custom_keys_list(optional, may be None): a Python list of dictionaries for each input row. Each list entry contains a dict of the customKeys that will be sent in the output (freely usable.)
The predict method must be able to predict multiple rows.
Enriching queries features
Testing your code
Developing a custom model implies testing often. To ease this process, a “Development server” is integrated in the DSS UI.
To test your code, click on the “Deploy to Dev Server” button. The dev server starts and loads your model. You are redirected to the Test tab where you can see whether your model loads.
You can then define Test queries, i.e. JSON objects akin to the ones that you would pass to the API node user API. When you click on the “Play test queries” button, the test queries are sent to the dev server, and the result is printed.
Python packages and versions
We strongly recommend that you use code environments for deploying custom model packages if these packages use any external (not bundled with DSS) library
Using a code env (recommended)
Each custom endpoint can run within a given DSS code environment.
The code environment associated to an endpoint can be configured in the “Settings” tab of the endpoint.
If your endpoint is associated to a code environment, when you package your service, DSS automatically includes the definition of the virtual environment in the package. When the API service is loaded in the API node, DSS automatically installs the code environment according to the required definition.
This allows you to use the libraries and Python versions that you want for your custom model.
Using the builtin env (not recommended)
If you use external libraries by installing them in the DSS builtin env, they are not automatically installed in the API Node virtual env. Installing external packages in the API Node virtual env prior to deploying the package is the responsibility of the API node administrator.
Note that this means that:
Two endpoints in the same service may not use incompatible third-party libraries or versions of third-party libraries
If you need to have two services with incompatible libraries, you should deploy them on separate API node instances
Available APIs in a custom model code
Note that, while the dataiku.* libraries are accessible, most of the APIs that you use in Python recipes will not work: the code is not running with the DSS Design node, so datasets cannot be read by this API. If you need to enrich your features with data from your datasets, see Enriching prediction queries. If you need to access a Folder, see Using a managed folder above.
Using your own libraries
You will sometimes need to write custom library functions (for example, shared between your custom training recipe and your custom model).
You can place these custom Python files in the project’s “libraries” folder, or globally in the lib/python folder of the DSS installation. Both recipes and custom models can import modules defined there.
When you package a service, the whole content of the lib/python folders (both project and instance) are bundled in the package. Note that this means that it is possible to have several generations of the service running at the same time, using different versions of the custom code from lib/python.
Performance tuning
Whether you are using directly the API Node or the API Deployer, there are a number of performance tuning settings that can be used to increase the maximum throughput of the API node.
For the Python prediction endpoint, you can tune how many concurrent requests your API node can handle. This depends mainly on your model (its speed and in-memory size) and the available resources on the server(s) running the API node.
One allocated pipeline means one Python process running your code, preloaded with your initialization code, and ready to serve a prediction request. If you have 2 allocated pipelines (meaning 2 Python processes), 2 requests can be handled simultaneously, other requests will be queued until one of the pipelines is freed (or the request times out). When the queue is full, additional requests are rejected.
Each Python process will only serve a single request at a time.
It is important to set the “Cruise parameter” (detailed below):
At a high-enough value to serve your expected reasonable peak traffic. If you set cruise too low, DSS will kill excedental Python processes, and will need to recreate a new one just afterwards.
But also at a not-too-high value, because each pipeline implies a running Python process consuming the memory required by the model.
Without API Deployer
Note
This method is not available on Dataiku Cloud.
You can configure the parallelism parameters for the endpoint by creating a JSON file in the
config/services folder in the API node’s data directory.
mkdir -p config/services/<SERVICE_ID>
Then create or edit the config/services/<SERVICE_ID>/<ENDPOINT_ID>.json file
This file must have the following structure and be valid JSON:
{
    "pool" : {
        "floor" : 1,
        "ceil" : 8,
        "cruise": 2,
        "queue" : 16,
        "timeout" : 10000
    }
}
Those parameters are all positive integers:
floor(default: 1): Minimum number of pipelines. Those are allocated as soon as the endpoint is loaded.ceil(default: 8): Maximum number of allocated pipelines at any given time. Additional requests will be queued.ceil ≥ floorcruise(default: 2): The “nominal” number of allocated pipelines. When more requests come in, more pipelines may be allocated up toceil. But when all pending requests have been completed, the number of pipeline may go down tocruise.floor ≤ cruise ≤ ceilqueue(default: 16): The number of requests that will be queued whenceilpipelines are already allocated and busy. The queue is fair: first received request will be handled first.timeout(default: 10000): Time, in milliseconds, that a request may spend in queue wating for a free pipeline before being rejected.
Creating a new pipeline is an expensive operation, so you should aim cruise around the expected maximal nominal query load.
With API Deployer
You can configure the parallelism parameters for the endpoint in the Deployment settings, in the “Endpoints tuning” setting.
Go to the Deployment Settings > Endpoints tuning
Add a tuning block for your endpoint by entering your endpoint id and click Add
Configure the parameters
Those parameters are all positive integers:
Pooling min pipelines(default: 1): Minimum number of pipelines. Those are allocated as soon as the endpoint is loaded.Pooling max pipelines(default: 8): Maximum number of allocated pipelines at any given time. Additional requests will be queued.max pipelines ≥ min pipelinesPooling cruise pipelines(default: 2): The “nominal” number of allocated pipelines. When more requests come in, more pipelines may be allocated up tomax pipelines. But when all pending requests have been completed, the number of pipeline may go down tocruise pipelines.min pipelines ≤ cruise pipelines ≤ ceil pipelinesPooling queue length(default: 16): The number of requests that will be queued whenmax pipelinespipelines are already allocated and busy. The queue is fair: first received request will be handled first.Queue timeout(default: 10000): Time, in milliseconds, that a request may spend in queue waiting for a free pipeline before being rejected.
Creating a new pipeline is an expensive operation, so you should aim cruise pipelines around the expected maximal nominal query load.