
Agent Hub
Overview
Agent Hub is the central portal for organizations to distribute enterprise-level agents, manage access, and empower users to build their own custom agents.
Agent Hub is a Dataiku plugin providing: a visual webapp, an export recipe and a custom dataset.
It allows users to access a library of AI agents and leverage a single agent or orchestrate multiple agents simultaneously through a unified chat interface.
Key Features
- Centralized Agent Library: Access from your browser a curated list of purpose-built agents built and selected by your AI experts and SMEs.
- Multi-Agent Orchestration: Chat with multiple agents in a single conversation. The Hub intelligently routes queries to the most relevant agent(s).
- User-Built Agents: Empower end-users to quickly create their own “My Agents” for personal productivity.
- Governance and Control: Configure which enterprise agents, LLMs, and tools are available within a Hub, ensuring control over usage.
- Response Transparency: View detailed sources, activities, and downloads for each agent response to understand how an answer was generated.
For more information, see also the following article in the Knowledge Base.
Getting Access
To use Agent Hub, a Dataiku instance administrator must first install the Agent Hub plugin from the plugin store. The administrator also needs to set up the associated code environment.
Once installed, Agent Hub becomes available as a Visual Webapp that can be created within any Dataiku project.
Configuration
Requirements
To successfully set up and use an Agent Hub, the following prerequisites are necessary:
Dataiku Version:
Dataiku 14.2or later. The Last Dataiku version is always the best choice to leverage the latest capabilities.- User Access Profiles:
To create the webapp: You must be part of a group that has write isolated code execution permission.
- To run the backend:
You must have a profile that is allowed to create and manage projects contents and impersonate users groups that are going to use Agent Hub.
For users in the cloud, identity running the backend must be part of the admin space.
To have access to the Agent Hub webapp admin settings: You must have
Writeaccess to the project containing the Agent Hub webapp.To use Agent Hub: Users with
AI ConsumerorAI Accessprofiles can use a Hub they have read access to. AI Access users can use, but not build agents and AI Consumers can both build and use agents.
Connections: A connection to at least one LLM AI model that supports tool calling and one that supports embedding.
Note
Permissions for impersonation in webapps are setup in Administration > Security > Group > Impersonation in webapps.
Allowed groups should include all groups of users that will access the Agent Hub. Typing .* will allow impersonation of all groups.
Initial Setup
Agent Hub is created as a visual webapp within a Dataiku project.
From your project, navigate to the Code menu and select Webapps.
Click
+ New Webappand chooseVisual webapp.Select the
Agent Hubtemplate from the list.
Note
While you can create Agent Hub webapp in the same project as your agents, it is recommended to create it in a dedicated project. This simplifies access management and oversight.
Backend Settings
Once the webapp has been created, you can select the execution settings from the Edit tab.
Auto-start backend: Check this box to ensure the Hub is running automatically.Number of processes: 0Container: Choose between using the backend to execute or containers.Data storage(for v1.2+):Choose between a local or external database to store Agent Hub data.
Supported remote databases: PostGre and for v1.4+ MS SQL.
Webapp Settings
Once execution settings have been selected, all of the webapp settings are directly configured by the webapp admin (for v1.1+).
Core Settings
Agent Hub has one mandatory LLM connection required to function.
Agent Hub LLM(Mandatory): Select an LLM that will be used across Agent Hub, particularly to orchestrate agents i.e. decide which agent to call in a multi-agent conversation. It is recommended to use a model that supports tool calling.Optional Instructions: You can optionally add a system prompt that will be used by the LLM when orchestrating agents.Agent Orchestration Mode: Choose between two modes:Tools: The LLM need to support tool calling. Active agents in the conversation are used as callable tools by the orchestrating LLM, which means they can be called multiple times and that the output of one can be used as the input of another.Manual: Use this mode when the LLM does not support tool calling. Agent Hub selects the relevant agents, can call each one once in parallel, and combines their outputs into a single response.
Document guardrails(v1.2+): Screen documents title and body (in-chat or in My agents) against a customizable list of prohibited keywords or regular expressions.Include DSS caller ticket in the agent context: Toggle to include the DSS caller ticket in the context sent to the agent, to execute tools on behalf of the end-user identity.Permanently delete messages: Toggle so that when users delete messages in the conversation, they are also deleted from the database.Advanced settings: Options to include network and client metadata for gateway reporting
Enterprise Agents
This section allows you to add pre-built, governed agents to the Hub.
Click on
Add Agent(s)and underSelect project, search for and select the Dataiku project(s) containing the agents you want to include.Amongst the list displayed, choose the specific agents/augmented LLMs to add.
- For each agent, you can configure the following:
Name: A user-friendly display name.Description (Mandatory): A detailed description of the agent’s capabilities and purpose. This is used by Agent Hub’s orchestrating LLM to understand when to call this agent. It is displayed to the end user in the Agent Library to describe the capabilities of the agent.Example questions: Sample questions that demonstrate how to use the agent.Additional instructions: Instructions that will be added to the Enterprise Agent’s system prompt.
Note
Enterprise Agents can be re-ordered by drag and dropping them. This impacts how they are displayed in the Agent Library.
My Agents
Configure the settings for user-created agents.
Enable My Agents: Toggle this option to allow users to create their own agents within the Hub.- Model
LLMs: Select at least one model that users can leverage when creating their own “My Agents”.Embedding Model: Select at least one model for embedding documents uploaded by users for their “My Agents”.Vision LLM: Select a model used by My Agents to process images and visual content for multimodal embeddings.
- General
Folder where My Agents will be created: Optionally specify a managed folder where user agents will be stored.Number of documents to retrieve: Maximum number of document chunks to retrieve for context.
- Documents
Local documents connection: Choose a connection where documents uploaded by users will be stored. This connection must allow the creation of managed folders.Max total documents upload: Set the maximum total size of documents that users can upload in they My Agents (in MB).Enable Sharepoint(v1.4+): Toggle this option to allow users to import documents from Sharepoint in their Quick Agents.Sharepoint connection: Select the Sharepoint connection from which the documents will be imported.Document synchronization: Set a frequency at which documents will be re-embedded.
- Datasets
Enable datasets(v1.3+): Toggle this option to allow users to query SQL datasets in their My Agents.- Pick between two modes:
Simple(recommended by default): all context is sent to the tool to generate the SQL query. Fast and efficient with datasets with a small number of columns.Agentic(recommended for large datasets): the tool dynamically calls context - this makes it slower but allows to work with datasets with a large number of columns, by only sending relevant columns in the context.
From WorkspacesandFrom Data Catalog: select where the datasets accessible to users for their My Agents can come from. These can come fromWorkspacesand/or theData Catalog.LLM For SQL generation(optional): Select the LLM that will generate the SQL queries.
Note
This is only available when the version of the semantic-models-lab plugin is 2.0 or higher.
Generating SQL requires is a complex task. We suggest using a top-tier model to ensure query precision.
Managed Tools: Select tools that users can pick for their agents. These can both be shared tools from other projects or tools instanciated in the project.Enable groups restriction for sharing: Limit sharing of My Agents to DSS groups to which the user belongs. Additionally, the webapp admin can choose to exclude specific groups from sharing.
Note
My Agent sharing: Assuming three users and their groups.
If user A belongs to groups 1 and 2, user B belongs to groups 2 and 3, and user C belongs to group 4.
If this setting is disabled [Default]: A can share its My Agents with users B and C.
If this setting is enabled:
A can only share them with user B.
If, in addition, group 2 is added to the
List of groups that users may not share with, A can no longer share agents with users B and C.
Prompt Library
Configure the prompts that are available to build My Agents. Prompts are managed in collections in the Enterprise asset library (14.4+) or in Agent Hub (14.2).
Once the Prompt Library is enabled, the webapp admin can choose collections of prompts to be made available to users, in My Agent creation.
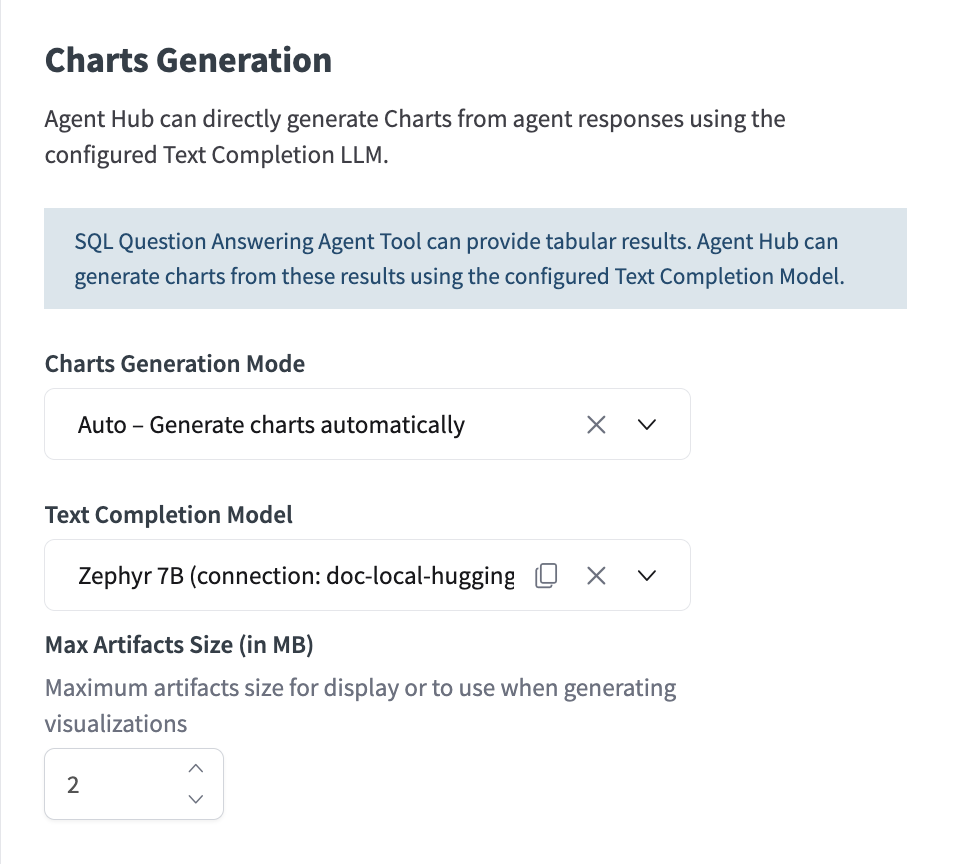
Charts Generation
Agent Hub can directly generate charts from agent responses that use tools returning records.
Charts Generation Mode:Select
None - Disable charts generationif this functionality is not needed. Else, charts will be generated using SQL artefacts of agents.Select
On Demand - Let end users generate charts, lets users decide when to generate charts and what type.Select
Auto - Generate charts automatically, automatically generates charts whenever the agent’s response includes SQL artefacts. The text completion model automatically chooses the type of graph based on the user query.
Text Completion Model: Choose an LLM connection to power chart generation if it is enabled.
Upload in Conversation
When the option Enable Document Upload is enabled by the webapp admin, users can upload documents (txt, pdf, docx, png, jpg, jpeg, pptx, md) in chat to enrich conversation context.
This requires setting up a managed folder where uploaded files will be stored.
There are two extraction modes the webapp admin can choose from:
Using pages as screenshots
Pages of PDF, PPTX and DOCX files are screenshotted and passed as is to the orchestrator or agents. This means that they need to support multimodal inputs (both text and images). In this mode, a maximum number of images that can be uploaded per conversation must be defined. If this maximum is reached, images (png, jpg, jpeg) are passed on to the multimodal LLM but only text is extracted from documents (PDF, PPTX and DOCX files).
Extracting text
In this mode, text is extracted from PDF, PPTX, DOCX files. Inline images in these documents can be processed with:
- OCR:
This identifies the characters in the inline image and converts it to text
Best for documents that don’t hold significant visual information (i.e. receipts)
- VLM:
Can “understand” visual elements, output is a textual description of the image. When queried, the LLM only uses the textual description generated, not the actual screenshot as in the first mode.
Best for photos, complex diagrams, charts, or screenshots of user interfaces where context/visual understanding matters.
It’s important to note that each and every image (including icons, logos, etc.) within the uploaded document are processed by the VLM, which can be very resource-intensive.
This requires DSS 14.3+
Not processed: This may result in information loss
User Experience
In the User Experience tab, the webapp admin can configure end-user interface settings.
- Interface Settings:
Smart mode: Enable auto-fill of My Agent’s description.Allow users to disable agents: Enabling this setting allows users to directly engage with an LLM. In this mode, their query is directly passed on to the head LLM and no agents are involved in generating the answer. The answer relies 100% on the LLM’s capabilities.
Conversation Starters: define queries and selection of linked agent(s) displayed on homepage.
Look and feel customization
Customize the interface look match your company’s brand guidelines or preferences. This applies to all users of the webapp. * Select a managed folder where assets will be stored. * Choose a default main color, home page title and logos for the interface.
User Settings
In the left sidebar of the chat interface, users can configure the language of the webapp (English, French or Japanese) and access a monitoring dashboard.
Setting up integrations with Stories and Traces Explorer
Traces explorer
On top of in-app traces of tool/agent calls, comprehensive trace can be viewed using the integration with Trace Explorer. To use this integration, you must:
Ensure that the
Traces Explorerplugin is installed on your Dataiku instance.Create a Trace Explorer webapp in a project and give read access to relevant user groups.
In Administration > Settings > LLM Mesh, set the default Trace Explorer webapp to the one you just created.
The button to navigate to Trace Explorer will then appear in See details > Activities.
Stories
When looking to generate quick visualizations from data, users can leverage in-chat chart generation. For more complex data storytelling, users can navigate to Stories for analyses in visual slides that support quality decision-making. To enable this, you must:
Ensure that you have a Workspace correctly set up with the datasets you want to use.
In Admin Settings > Enterprise Agents, toggle
Allow users to create Insights in Dataiku Storiesand select the workspace where the stories will be created.
Navigating to Stories will automatically be available in the chat interface when the agent response includes SQL artefacts.
Note
Dataiku Stories is not available in all Dataiku licenses. You may need to reach out to your Dataiku Account Manager or Customer Success Manager
Building tools that integrate with Agent Hub
You can build custom tools that can be used by agents within Agent Hub.
In-chat authentication
When a tool relies on a DSS connection that requires per-user credentials, end users can now be prompted directly in the chat interface to authenticate.
The authentication prompt is only displayed when credentials are actually missing — if the user is already authenticated on the connection, nothing is shown.
This mechanism is supported for tools that call DSS connections using any of the following credential types:
Username/password connections
Single-field / API-key credentials
OAuth redirect credentials
Azure OAuth device-code credentials
Note
In-chat authentication only applies to tools backed by DSS Connections.
Tools that authenticate through other means (e.g., custom code calling external APIs with their own auth) are not covered.
Missing-credentials error
For the in-chat authentication flow to trigger, your tool must surface missing-credential errors so that Agent Hub can detect them.
Example of an error that will be detected:
DataikuException: com.dataiku.dip.exceptions.DKUSecurityRuntimeException:
User 'admin' does not have credentials for connection 'snowflake-per-user' to access Snowflake
This is the standard message format of DKUSecurityRuntimeException, which DSS raises automatically when a user tries to use a per-user connection they haven’t authenticated against.
In practice, this means your tool should simply let the underlying DSS exception propagate.
Display Sources
If you want your agent data sources or references to be displayed in the “Sources” tab, you must provide this information into the additionalInformation field of their tool calls.
{
   "toolCallDescription": "Revenue Analysis",
   "items": [
      {
      "type": "INFO",
      "textSnippet": "Analyzing sales data for Q3..."
      },
      {
      "type": "GENERATED_SQL_QUERY",
      "performedQuery": "SELECT date, revenue FROM sales WHERE quarter = 'Q3'"
      },
      {
      "type": "RECORDS",
      "records": {
         "columns": ["date", "revenue"],
         "data": [
            ["2023-07-01", 100],
            ["2023-07-02", 120]
                ]
         }
      }
   ]
}
Then you will need to tag each type of item used.
Tag to Use |
Display Text in “Sources” Tab |
|---|---|
|
Document |
|
Document |
|
Records |
|
Generated SQL Query |
|
Code Snippet |
|
Image |
|
Info |
Note
If you send a custom string (e.g., API_RESPONSE), the UI will display the raw string “API_RESPONSE” instead of a polished label.
Generate graphs
If you want your tool to return data that can be used to generate charts in the chat interface, you must return an artifact of type RECORDS.
{
   def _create_record_payload(df):
   return {
      "type": "RECORDS",  # Critical: tells UI to treat this as chartable data
      "records": {
            "columns": df.columns.to_list(),  # List of string headers
            "data": df.values.tolist()        # List of lists (rows)
      }
   }
}
Downloadable Files
To make files generated by your tool downloadable in-chat and include them in the Downloads tab, you can return artifacts in your tool’s output payload.
Two methods are supported for generating downloadable files: Tabular Records and Inline Data.
Tabular Records
If your tool returns an artifact of type RECORDS.
If a single table is returned, the UI will automatically generate and provide a
.csvfile for download.If multiple tables are returned, they will be automatically zipped into a single
.zipfile.
Inline Data
For any other file types (such as PDFs, XLS, DOCX, PPTX…) you can return an artifact containing a DATA_INLINE part.
When returning a DATA_INLINE artifact, the following fields are populated in the Downloads tab:
name: Title displayed on the download card. It’s recommended to include the file extension in the name.mimeType: File format displayed and associated subtext label.dataBase64: The actual base64-encoded string of the file’s binary content.
Example Artifact Payload:
"artifacts": [
   {
      "name": "Q3_Financial_Summary.pdf",
      "parts": [
            {
               "type": "DATA_INLINE",
               "mimeType": "application/pdf",
               "dataBase64": "JVBERi0xLjQKMSAw..."
            }
      ]
   }
]
Human in the Loop
All native and custom tools in DSS can enforce user validation before being executed. This is defined in the tool Settings > Human approval.
When this is set up, users will receive in-chat a prompt to approve or reject the tool call, and optionally edit its parameters.
Agent Hub Ops
It’s recommended to use a single project to host the Agent Hub webapp, separate from the project hosting the Enterprise agents.
Testing should occur on a Design instance. When ready, the project containing Agent Hub should be bundled and pushed to production, along with projects containing agents intended for exposure within Agent Hub. After deployment, the WebApp will have to be reconfigured, i.e. the webapp admin will have to choose connections that are on the automation node and add relevant enterprise agents that are on the automation node.
Once on the automation node, the dependencies of Agent Hub can be updated without touching the Agent Hub project. This means that Enterprise Agents follow the classic CI/CD process. Once deployed, the Agent Hub project isn’t meant to be modified in the design node or re-deployed - that would replace the parameters with those from design.
Using Agent Hub
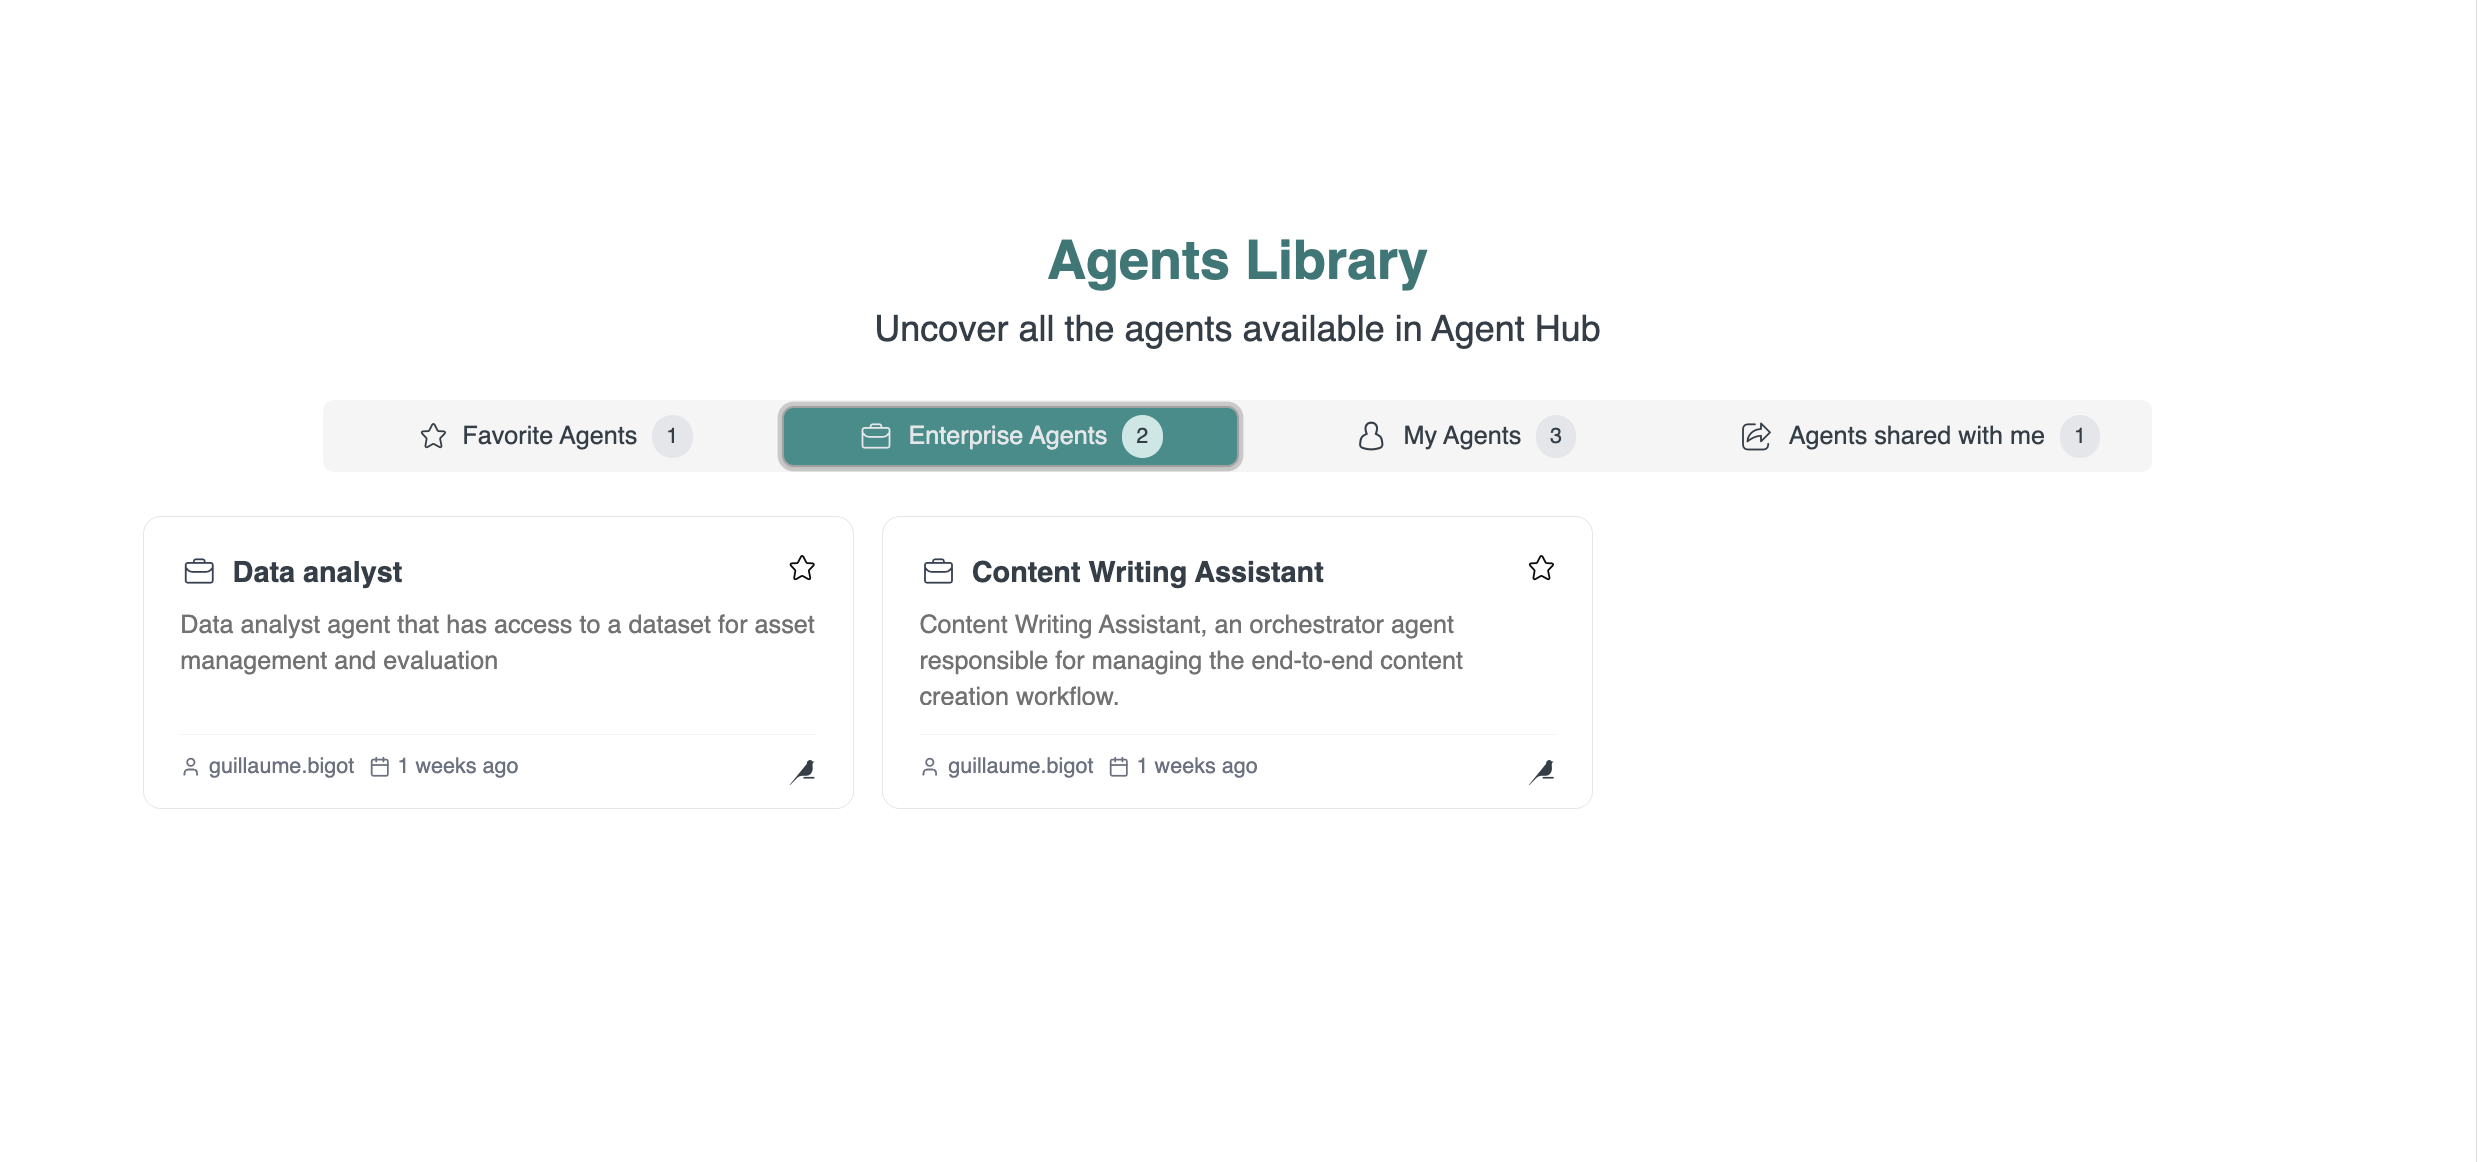
Agent Library
The Agent Hub interface organizes all available agents into four categories:
Enterprise Agents: Governed agents distributed by designers for wide use.
My Agents: Agents you have created for your own productivity tasks.
Agents Shared with Me: “My Agents” that other users have shared with you.
Favorite Agents: Any agent you have marked with a star for quick access.
Conversations with Agents
Users can start a conversation from the homepage or by selecting an agent. They can manually add or remove agents during the conversation.
The orchestrating LLM manages the conversation based on the number of agents selected.
Single agent: The query is directly passed to the selected agent, with the conversation history.
- Multiple agents:
For each question, the LLM filters the multiple agents selected and only keeps the relevant onees, using the descriptions of agents.
Depending on the filtering, there can be no agent left and the default LLM answers the question, one agent left and we fallback to the single agent mode, or 2+ agents left.
If 2+ agents are left, they are called as tools (if the orchestration mode is set to
Tools) or else in parallel, as described in the backend settings.
No agent selected: Same as previous but with all agents available to the end user.
Agents disabled: If the end-users have disabled agents in conversation, their query is directly passed on to the head LLM and no agents are involved in generating the answer.
All conversations are saved in the left panel, where you can rename, delete, or revisit them.
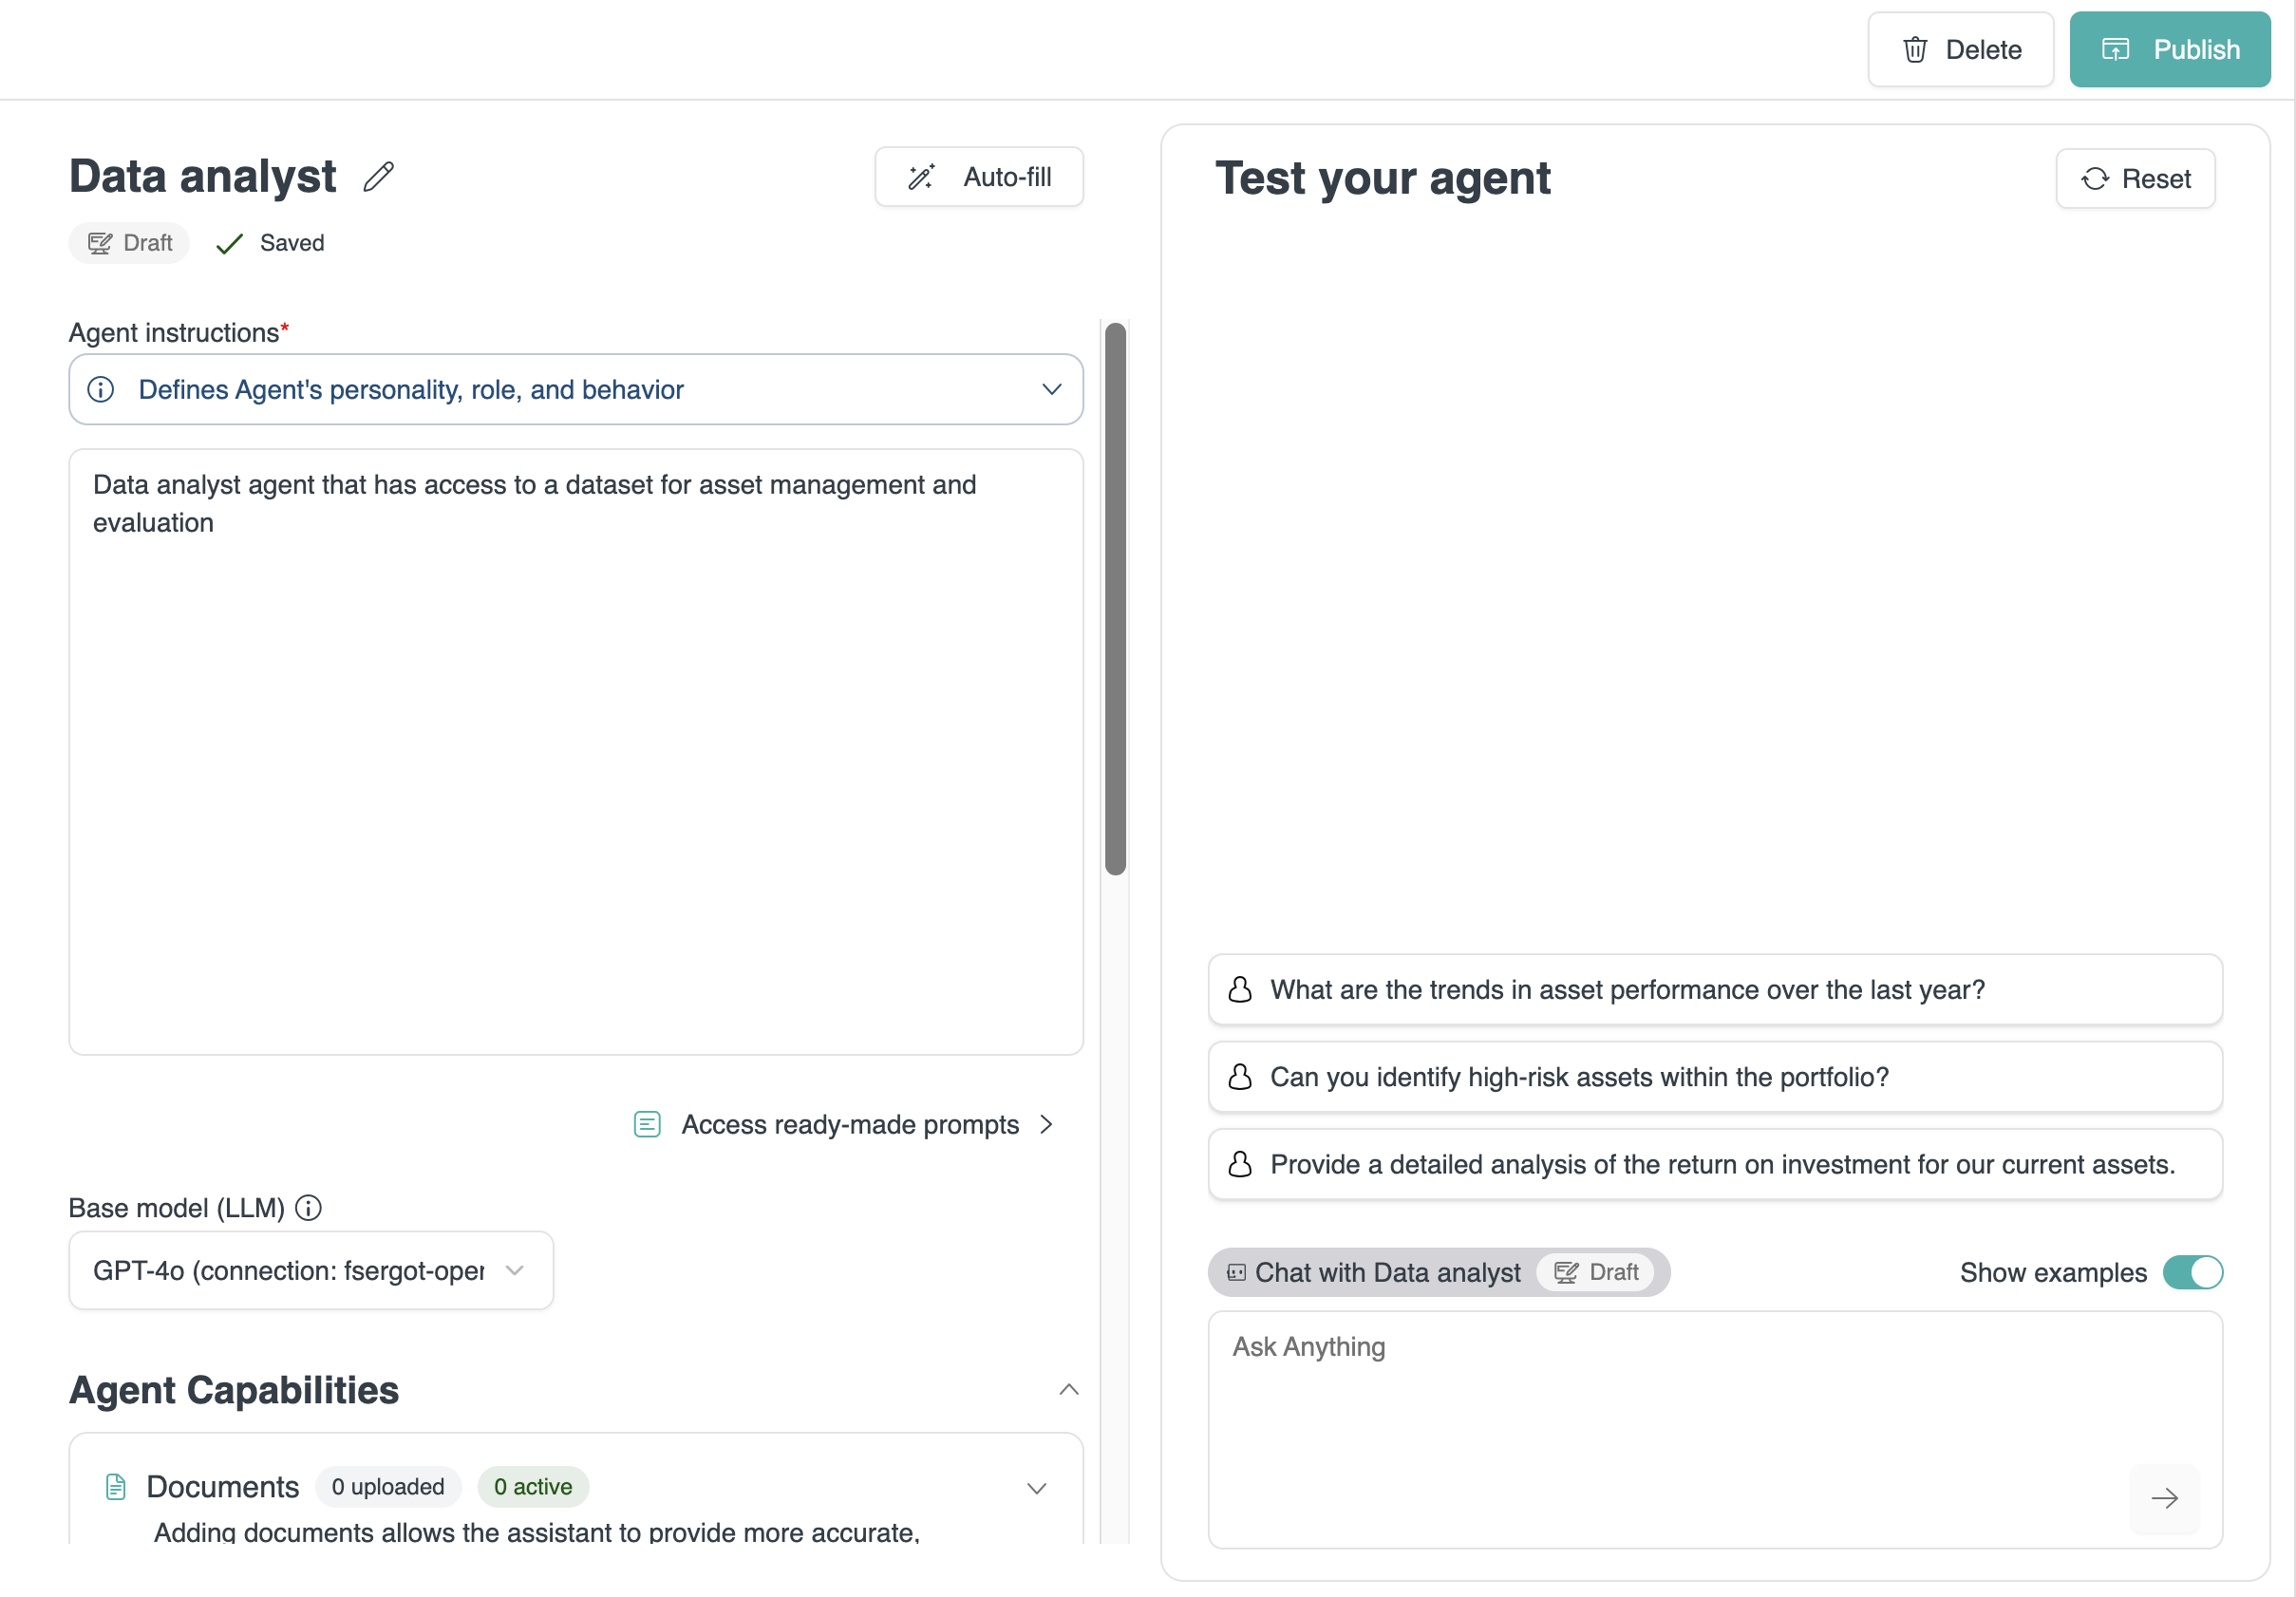
Building “My Agents”
Users with at least an AI Consumer profile can create their own agents directly within the Hub.
Click
Create new agent.Provide detailed
Agent instructionsin the prompt window or use a template from thePrompt library.Under
Agent Capabilities:Upload
Documentsto provide the agent with specific knowledge. Dataiku automatically embeds these documents.Add a
Datasetto let the agent query its data so that users can analyze and visualize it.Add
Toolsto let the agent perform actions or access external services.
Manually fill or use the
Autofillbutton to generate anAgent Overview, to provide an agent description and optionally some example queries.Test your agent in the chat window and click
Publishwhen you are satisfied with its performance.
Understanding Responses
Agent Hub allows you to inspect how an agent generated its response.
Click the See details button below any response to open a panel with three tabs:
Sources: References to the documents, datasets, or other knowledge sources used by the agent.
Activities: A log of which agents and tools were called by the Hub and what actions they performed.
Downloads: Download any files generated by the agent.
Monitoring and Quality checks
Extracting Agent Hub’s logs
Once Agent Hub is set up and in production, you can extract Agent Hub’s logs to monitor usage and evaluate Enterprise Agents.
To do that, you can either use a recipe that extracts Agent Hub’s raw database or create a virtual dataset on the relevant database tables.
The user running this recipe must also be used as the backend identity of Agent Hub.
The recipe to export data from AH to datasets
In the flow, click on Add item > Recipe > Generative AI > Agent Hub.
In the recipe, you can choose the project, the Agent Hub webapp instance, and the tables he wants to export. These are mapped out to the output datasets.
Given the potentially important size of artifacts, you can choose to keep them compressed.
A scenario can be run regularly to sync the data.
Creating a virtual dataset
A second option is to create a virtual dataset: Add item > Connect or Create > Generative AI > Agent Hub.
This reads a single table from an Agent Hub Webapp internal database, effectively creating a virtual dataset that can then be synced in the flow, and used just like the previous extracted datasets. Virtual datasets make requests to the Agent Hub’s internal database each time it is accessed - this can potentially be expensive.
Monitoring
Once the database is extracted, a dashboard can then be easily created atop these datasets to monitor Agent Hub activity more deeply. Furthermore, a monitoring dashboard is provided out-of-the-box in Agent Hub, including usage activity and user feedback, broken down by agents.
Quality checks
The extracted datasets include conversations and traces, can be used to perform custom quality checks of the agents exposed through Agent Hub.
Security and Permissions
When setting up Agent Hub, you have control over who has access to the webapp, which agents they can see and use, and what they can do with them. This is managed through a combination of DSS project permissions, DSS user groups and webapp settings.
Webapp permissions
- First you want to define who can access the Agent Hub webapp. There are multiple ways to do this:
Give end-users or their user groups read access to the project hosting the Agent Hub application.
Share the Agent Hub webapp within a workspace that the end-users have access to.
Add the Agent Hub webapp to the list of authorized objects in the
Project securitysettings and grantRead dashboardspermission to end-users to the project hosting the webapp.
End-users that have write access to the project hosting the webapp will have access to the webapp’s settings.
Enterprise agents permissions
Once you’ve defined who can access the Agent Hub webapp, you can control which Enterprise agents they can see and use within the Hub. Users will only see the agents they have read access to in their Agent Library .
- There are different ways to do this:
Give end-users or their user groups
Read project contentpermissions on the Dataiku project(s) that contain the Enterprise Agents.Add the agent to the list of authorized objects in the
Project securitysettings and grantRead dashboardspermission to end-users or their user group to the project hosting the agent.
Note
Calls to the agent and tools are made by default using the identity of the user running the backend. This allows for giving minimum permissions to end-users. If you want to use end-user identity for calls, to authenticate or have role-based access control, refer to the following section.
User Access Profiles
A user’s access level and capabilities within Agent Hub are determined by their Dataiku profile.
AI Access: Can use agents but cannot build them.
AI Consumers: Can use, build and share My Agents.
Full Designer: All previous capabilities, plus can build, configure, and manage Agent Hubs.
Technical accounts: Can be used to run the backend of Agent Hub.
Identity Forwarding and Data Security
Objects sent as part of agent context
When an agent is called in Agent Hub, the system automatically forwards a set of metadata and security tokens to the agents and tools.
Here’s a generic example of what’s sent as part of the context:
"context": {
  # List of groups and identifiers used to filter Knowledge Bank results (Document Level Security)
  "callerSecurityTokens": [
    "readers",
    "dss_group:readers",
    "dss_user_login:alex",
    "dss_user_emailaddress:[email protected]"
  ],

  # Unique UUID for the current chat session tracking
  "conversationId": "63d54d50-64ca-4761-b7a6-342a9da3d5ab",

  # Sensitive API ticket allowing tools to act as the end-user (RBAC)
  "dkuCallerTicket": "REDACTED",

  # Identity tracking for 'Run as' or 'End-user caller' scenarios
  "dkuOnBehalfOf": "alex",
  "dkuOnBehalfOfDisplayName": "Alex User",
  "dkuOnBehalfOfEmailAddress": "[email protected]",

  # Network and Client metadata for gateway reporting and custom LLM headers
  "dkuOnBehalfOfClientIP": "127.0.0.1",
  "dkuOnBehalfOfUserAgent": "Mozilla/5.0 (Macintosh; Intel Mac OS X 10_15_7)...",

  # Standard user profile information
  "dku_user_login": "alex",
  "dku_user_email": "[email protected]",
  "dku_user_display_name": "Alex"
    }
Document-level security
Document-Level Security enables granular access control over documents within a knowledge bank. It ensures that when a user performs a search or query, the results only include documents that user is authorized to view.
User security tokens are passed on to agents called within Agent Hub. These tokens aren’t used for authentication but rather filtering of the knowledge bank.
The caller security tokens include dss_group, dss_login and dss_email.
For instance, here are the tokens passed on for a user named Alex (login: alex), who belongs to readers and editors groups:
"callerSecurityTokens": [
   "readers",
   "editors",
   "dss_group:readers",
   "dss_group:editors",
   "dss_user_login:alex",
   "dss_user_emailaddress:[email protected]"
],
In this case, Alex will only see documents that are accessible to the readers group or the editors group.
Role-based access control
Requires DSS 14.3.2+ Rather than calling tools with the backend identity, you can choose to use end-user identity for tool calls.
This is useful for row-level security on datasets and can be used when building custom tools making API calls in DSS.
This has to be configured at the tool level, and works natively with the SQL Query Tool and the Dataset Lookup Tool.
In the tool configuration, under the “Security” section, select “Access datasets as” and choose “End-user caller”.
This is done by obtaining the API ticket from the user’s browser headers, which is passed by the agent through the agent as dkuCallerTicket. This requires Agent Hub to trust all the agents and tools in the chain, because it will now be passing sensitive / secret information to them
Note
Make sure that agents pass on the context. This requires ticking Forward context in the Query another agent or an LLM tool.