Snowflake
Note
You might want to start with our resources on data connections in the Knowledge Base.
DSS supports the full range of features on Snowflake:
Reading and writing datasets
Executing SQL recipes
Performing visual recipes in-database
Using live engine for charts
In addition, Dataiku supports unique extended computation push-down capabilities, by leveraging unique Snowflake features (Java UDF). See Extended push-down for more details.
Connection setup (Dataiku Custom or Dataiku Cloud Stacks)
The Snowflake JDBC driver is already preinstalled in DSS and does not need to be installed
Fill in the settings of the connection using your Snowflake information.
(Optional but recommended) Fill auto-fast-write settings - see Writing data into Snowflake
(Optional but recommended) Enable advanced pushdown - see Extended push-down
(Optional but recommended) Enable Spark integration - see Spark native integration
Connection setup (Dataiku Cloud)
To set up a Snowflake connection you need to be a Dataiku Cloud Space Admin. You can set up the connection with global credentials (default option) or with per-user credentials.
In your launchpad, select “Add Feature”, then “Snowflake” (either read-only or read-write)
Fill the settings
To set up the connection with global credentials
When choosing a read-write storage, you can either:
Enter existing settings (you then need: a warehouse, a user/password a role, a database, a schema and a stage, all accessible and writable)
Let Dataiku Cloud auto-generate a SQL statement that you can run in your Snowflake account and that will automatically create all necessary connection items. Let the wizard guide you.
To set up the connection with per-user credentials
You have to create your connection by entering existing settings,
Then each user will have to fill in their credentials individually.
Also, note that therefore the connection can not be tested from the launchpad with this setup.
After the Space Admin has completed this first step in the launchpad, each user needs to do the following in their DSS:
Go to your Dataiku DSS
Go to User (image icon top right) > Profile and settings (gear icon) > Credentials
Click the “Edit” button next to the new connection name
Follow the instructions that appear
You can now test the connection
Authenticate using OAuth2
DSS can authenticate to Snowflake using OAuth2.
OAuth2 access is performed using per-user credentials. Each user must grant DSS permission to access Snowflake on their behalf. You can use your own OAuth2 authorization server so the exact configuration will depend on your environment, but you will need to first set up your OAuth2 authorization server and then a security integration in Snowflake to establish a trust.
Both “External OAuth” and “Snowflake OAuth” are supported
In your Snowflake security integration, the oauth_redirect_uri parameter should have the format DSS_BASE_URL/dip/api/oauth2-callback as described under OAuth2 credentials.
(See the official documentation for more details)
Once you have a trust between your OAuth2 authorization server and Snowflake, do in DSS the following:
Create a new Snowflake connection
Fill in the basic params (Host, Database, Warehouse, Role, Schema) as usual
Select “OAuth” as the “Auth Type”. Note that this will force you to use per-user credential.
Fill the “Client id”, “Client secret” (if there is one) with the information from your OAuth app
Fill the “authorization endpoint” and “token endpoint” with your endpoint. Or leave them blank if you are using the default Snowflake OAuth2 server
Fill the scope with the operations and roles permitted for the access token (This depends on your OAuth Server so check the official doc). Or if you do not want to manage Snowflake roles in your OAuth2 server, pass the static value of
SESSION:ROLE-ANYin the scope.Depending on your OAuth2 server you may also need to ask for a refresh token in the scope. This is usually done by adding
offline_accessto the scope but that may vary depending on your OAuth2 provider.Create the connection (you can’t test it yet)
Then for each user:
Go to user profile > credentials
Click the “Edit” button next to the new connection name
Follow the instructions that appear
You can now test the connection
Common errors
Problem: OAuth2 token request did not return a refresh token.
Solution: Be sure that you ask for an OAuth 2.0 refresh token in the scope. This is usually done by adding
offline_accessto the scope but it may vary depending on your OAuth2 provider.
Writing data into Snowflake
Loading data into a Snowflake database using the regular SQL INSERT or COPY statements is inefficient and should only be used for extremely small datasets.
The recommended way to load data into a Snowflake table is through a bulk COPY from files stored in Amazon S3, Azure Blob Storage or Google Cloud Storage (depending on the cloud your Snowflake is running on).
DSS can automatically use this fast load method. For that, you require a S3, Azure Blob or Google Cloud Storage connection. Then, in the settings of the Snowflake connection:
Enable “Automatic fast-write”
In “Auto fast write connection”, enter the name of the cloud storage connection to use
In “Path in connection”, enter a relative path to the root of the cloud storage connection, such as “snowflake-tmp”. This is a temporary path that will be used in order to put temporary upload files. This should not be a path containing datasets.
DSS will now automatically use the optimal cloud-to-Snowflake copy mechanism when executing a recipe that needs to load data “from the outside” into Snowflake, such as a code recipe.
Note that when running visual recipes directly in-database, this does not apply, as the data does not move outside of the database.
The cloud storage and Snowflake connections must be in the same cloud region.
Requirements on the cloud storage connection
For Amazon S3
The S3 connection must not be using “Environment” mode for credentials
For Azure Blob
You must generate a SAS Token, then save the token in the Azure Blob Storage connection settings in the “SAS Token” field.
For Google Cloud Storage
You must create a Snowflake storage integration, then save the storage integration name in the GCS connection settings in the “Snowflake storage integration” field.
Explicit sync from cloud
In addition to the automatic fast-write that happens transparently each time a recipe must write into Snowflake, the Sync recipe also has an explicit “Cloud to Snowflake” engine. This is faster than automatic fast-write because it does not copy to the temporary location in the cloud storage first.
It will be used automatically if the following constraints are met:
The source dataset is stored on S3, Azure Blob Storage or Google Cloud Storage
The destination dataset is stored on Snowflake
The cloud storage side is stored with a CSV format, using the UTF-8 charset
For the cloud storage side, the “Unix” CSV quoting style is not used
For the cloud storage side, the “Escaping only” CSV quoting style is only supported if the quoting character is
\For the cloud storage side, the files must be all stored uncompressed, or all stored using the GZip compression format
In addition:
The cloud storage and the Snowflake cluster must be in the same cloud region
The “Requirements on the cloud storage connection” defined above must be met.
Additionally, the schema of the input dataset must match the schema of the output dataset, and values stored in fields must be valid with respect to the declared Snowflake column type.
Unloading data from Snowflake to Cloud
Unloading data from Snowflake directly to DSS using JDBC is reasonably fast. However, if you need to unload data from Snowflake to S3, Azure Blob Storage or Google Cloud Storage, the sync recipe has a “Snowflake to Cloud” engine that implements a faster path.
In order to use Snowflake to Cloud sync, the following conditions are required:
The source dataset must be stored on Snowflake
The destination dataset must be stored on Amazon S3, Azure Blob Storage or Google Cloud Storage
The cloud storage and the Snowflake cluster must be in the same cloud region
The “Requirements on the cloud storage connection” defined above must be met.
The cloud storage side must be stored with a CSV format, using the UTF-8 charset
For the cloud storage side, the “Unix” CSV quoting style is not supported
For the cloud storage side, the “Escaping only” CSV quoting style is only supported if the quoting character is
\For the cloud storage side, the files must be all stored uncompressed, or all stored using the GZip compression format
Additionally, the schema of the input dataset must match the schema of the output dataset, and values stored in fields must be valid with respect to the declared Snowflake column type.
Extended push-down
Note
This feature is automatically enabled on Dataiku Cloud, no action is required.
Dataiku can leverage unique Snowflake capabilities (Java UDF) in order to extend push-down of both prepare recipes and scoring recipes, for much enhanced performance.
Extended push-down capabilities are documented in:
In order to enable extended push-down, you need to:
In your Snowflake account, create a stage that is writable by the user(s) configured in the Snowflake connection
Ensure that you have installed DSS using a Java JDK and not JRE
In the Snowflake connection settings, enable “Use Java UDF”
In “Stage for Java UDF”, enter the name of the stage created above
In “path in stage”, enter a path within the stage. This can be anything, such as “dataiku-pushdown”
Spark native integration
The native integration with Spark allows Spark recipes reading from and/or writing to Snowflake datasets to directly exchange data with a Snowflake database. This results in a large increase in performance compared to the default method where data read from or written to Snowflake must be streamed through DSS first. All Spark recipes which have a Snowflake dataset as an input or an output will automatically take advantage of the native integration with Snowflake if enabled on the connection.
For each Snowflake connection, you must enable “Use Spark native integration” in the Snowflake connection settings.
Snowpark integration
Dataiku can leverage the Snowpark framework in order to read Dataiku datasets stored in Snowflake, build queries using Dataframes and then write the result back to a Snowflake dataset.
Snowpark integration can be used in Python code recipes and in Jupyter notebooks.
In order to use it, you will need:
A Snowflake Account with Anaconda Integration enabled by ORGADMIN
A Snowflake connection using user/password credentials (OAuth support to come soon), with Security option “Details readable by” set to Every analyst or Selected groups.
A Dataiku Code Env based on Python 3.8, with the package “snowflake-snowpark-python” installed.
To get started with Snowpark, follow these steps:
Ensure the above prerequisites are fulfilled
Create a Snowflake dataset
From this dataset, create a Python recipe with an output dataset stored on the Snowflake connection
Switch to Advanced tab. In the Python environment section, select a Code Env with Snowpark installed
Switch to Code tab. Delete all lines except the first two (keep the import dataiku)
Click the “{} CODE SAMPLES” button and enter Snowpark in the search field.
Select “Read and Write datasets with Snowpark”
Click the “+ INSERT” button corresponding to “Load a dataset as a Snowpark dataframe and write into another dataset”
Run the recipe. You’re all set.
Switching Role and Warehouse
Snowflake allows users to execute SQL operations while assuming a specific user Role and using a specific Warehouse.
In Dataiku, users have the flexibility to assume a different Role and use a different Warehouse for each recipe of the flow through defining connection variables for:
Role
Warehouse
How to set it up
1. Parameterize the Snowflake connection
In the definition of the Snowflake connection, substitute the desired parameters by variables. Here, our Roles and Warehouses in Snowflake are uppercase so we capitalize the parameters:

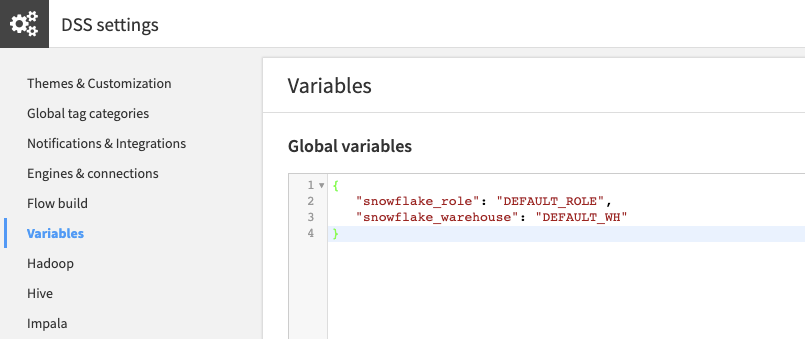
2. Define instance-level variables
Note
On Dataiku Cloud, global variables are defined in the launchpad’s settings tab.
Defining instance-level variables helps prevent cases where the user will not define a value for the parameters. Global variables will be used as default values.

3. Override the variables where needed
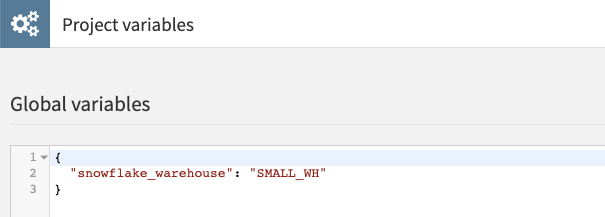
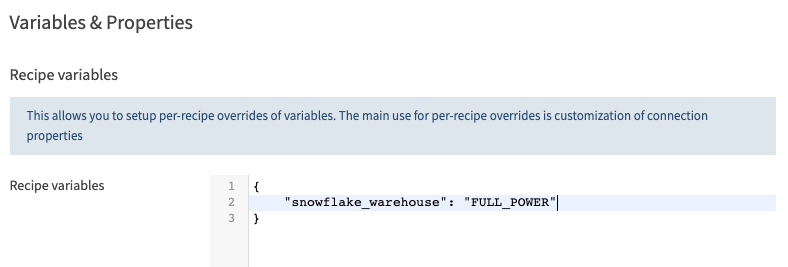
This can be recursively done, overriding parameters in the order shown here (where left overrides right): Recipe > Scenario > Project > User > Global
A typical use case involves overloading the Warehouse at the project level:

For some use cases it is also possible to overload the Warehouse at the recipe level:

Another use case involves overloading the Role at the user level. User properties are prefixed via userProperty: so you would
need to use the syntax ${userProperty:snowflake_role} instead of ${snowflake_role} when parameterizing the Snowflake connection, and
the global variable would be named userProperty:snowflake_role. Then each user would be able to override the role by adding a property snowflake_role to their profile:


Limitations and known issues
Visual recipes
Sample/Filter: “contains” operator is not supported
Group: aggregating on booleans is not supported
Window: cumulative average is not supported (Snowflake limitation)
Prepare: in the formula processor, when providing a date parameter to a function, the displayed date might differ between the preview and a real SQL query. It is possible to set the format by setting Advanced JDBC properties in the connection, like TIMESTAMP_OUTPUT_FORMAT for timestamp. See https://docs.snowflake.com/en/user-guide/date-time-input-output.html#output-formats for more information.
Coding recipes
Execution plans are not supported
Spark native integration
Writing to Snowflake datasets with column names that contain periods is not supported (Snowflake Connector for Spark limitation)
The Snowflake Connector for Spark only supports Spark versions 2.2, 2.3, and 2.4
Breaking changes
8.0.2 -> 8.0.3:
All columns of type TIMESTAMP_NTZ are now stored in DSS as String, unless users have checked the option Read SQL timestamp without timezone as DSS dates
When the Snowflake session TIMESTAMP_TYPE_MAPPING consider TIMESTAMP to be TIMESTAMP_NTZ, all columns of type TIMESTAMP are now stored in DSS as String, unless users have checked the option Read SQL timestamp without timezone as DSS dates
Advanced install of the JDBC driver
Note
This feature is not available on Dataiku Cloud.
The Snowflake JDBC driver is already preinstalled in DSS and does not usually need to be installed. If you need to customize the JDBC driver, follow the instructions
The Snowflake JDBC driver can be downloaded from Snowflake website (https://docs.snowflake.net/manuals/user-guide/jdbc.html)
The driver is made of a single JAR file snowflake-jdbc-VERSION.jar
To install:
Copy this JAR file to the
lib/jdbc/snowflakesubdirectory of the DSS data directory (make it if necessary)Restart DSS
In each Snowflake connection, switch the driver mode to “User provided” and enter “lib/jdbc/snowflake” as the Snowflake driver directory
Spark integration
The Spark native integration is preinstalled and does not usually need to be installed. Only follow these steps for custom installations.
Two external JAR files are required to be installed in DSS
The same Snowflake JDBC driver mentioned above
The Snowflake Connector for Spark (provided by Snowflake). It can be downloaded directly from Maven under the
spark-snowflake_2.11artifact ID (https://search.maven.org/classic/#search%7Cga%7C1%7Cg%3A%22net.snowflake%22). Make sure to choose the correct version of the connector for the version of Spark installed (only versions 2.2-2.4 are supported).
Note
The version of the Snowflake Connector JAR must be compatible with the version of the Snowflake JDBC driver. For example, an older version of the JDBC driver combined with the latest version of the connector may cause errors with confusing exception messages when running jobs. We recommend using the latest version of each JAR.
Copy both of these JAR files to the
lib/javasubdirectory of the DSS data directory (even if the JDBC driver has already been placed inlib/jdbcas described above)Restart DSS
Check the “Use Spark native integration” box in the Snowflake connection settings. This checkbox can also be used to toggle the integration on and off without having to remove the JARs.
