
Wikis
Each DSS project contains a Wiki.
You can use the Wiki of a project:
To document the project’s goals
To document the project’s inputs and outputs
To document the inner workings of the project
As a way to organize your work with your colleagues
To keep track of planned future enhancements
The DSS wiki is based on the well-known Markdown language.
In addition to writing Wiki pages, the DSS wiki features powerful capabilities.
Taxonomy
All the pages of the Wiki are organized in a hierarchical taxonomy. Each article can have a “Parent” article (articles can also have no parent and be attached to the root of the hierarchy).
The taxonomy can be browsed in order to get a quick overview of your Wiki
Attachments and links
Attaching files
You can attach multiple files to each Wiki article. Simply click the “Add attachment” button, and go to the “File” tab
Directly linking to a DSS object
In your Wiki article, you can create clickable links to any DSS object (dataset, recipe, notebook, ….) in the project or in another project. See the documentation about Markdown for details on the syntax to create links to DSS objects
Attaching DSS objects
In addition to links inline in the Wiki article, you can “attach” a DSS object to a Wiki article. This object will always appear in the list of attachments.
Referencing attachments
To add a reference to an attachment in the body of an article, click the attachment name while you are in “Edit” mode for the Article
Folder layout
Articles can be switched to a “Folder-oriented” layout where the article text appears at the top, followed by a detailed list of all attachments, including both files and DSS objects.
To switch between layouts, use the “Actions > Switch to folder layout” or “Actions > Switch to article layout” buttons in the Actions menu.
Promoted wikis
The administrator of a DSS project can “promote” the Wiki of a project by going to Settings > Wiki.
Wikis that are promoted will appear in the DSS-wide “Wikis” (accessible from the main menu) for users who have access to the project
Help center articles
Selected articles can be made available in the “Support Resources” section of the help center. It is recommended to use this feature to put on the help center a few articles related to your particular onboarding / getting started (for example: where is the data, who to ask for help, …)
Help center articles are controlled by global DSS administrators, from the “Administration -> Settings -> Help and support” page
Note
You can also give quick access to wiki articles in the home page, by setting them up as promoted content, from the Administration -> Settings -> Homepage page. See Managing promoted content for more details.
Publishing an article on the dashboard
There is a specific dashboard insight to show a Wiki article on the dashboard.
Wiki Export
Wiki articles can be exported to PDF files in order to propagate information inside your organization more easily.
Wiki exports can be:
Created and downloaded interactively through the wiki user interface
Created automatically and sent by mail using the “mail reporters” mechanism in a scenario
Created automatically and stored in a managed folder using a dedicated scenario step
Setup
The graphics export feature must be setup prior to being usable.
If you are running Custom Dataiku, follow Setting up DSS item exports to PDF or images to enable the export feature on your DSS instance. If you are running Dataiku Cloud Stacks, you do not need any setup.
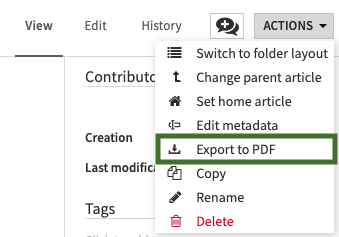
Interactive usage
Export an article directly from a wiki article.
Options
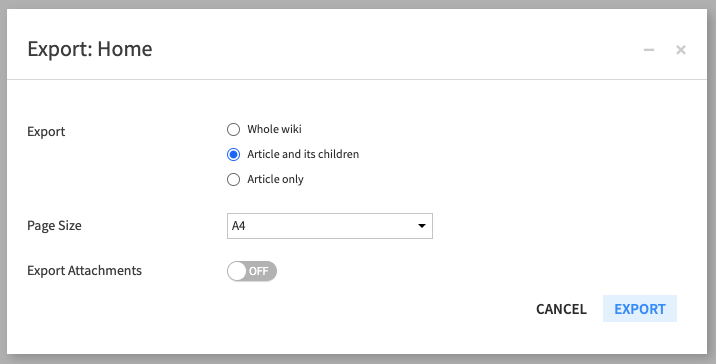
The following options are available:
Export :
Whole wiki : export the entire wiki of the project.
Article and its children : export the current article and the entire hierarchy beneath it.
Article only : export the current article.
Page size : determines the dimensions of the page.
Export attachments : generates a zip file containing the selected articles as a PDF, along with any attachments. Linked DSS items are not exported.
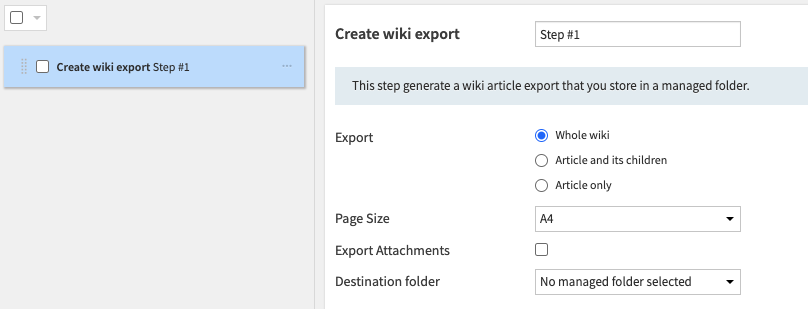
Automatic usage
In a scenario, there are two ways to create wiki exports, with the same options available as the interactive export:
Create a “wiki export” step that allows you to store an export in a local managed folder.
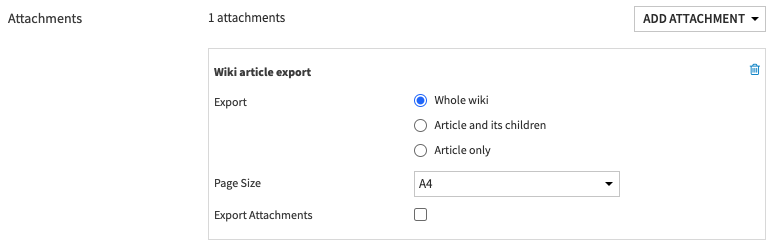
With a mail reporter and a valid mail channel, you can select a “wiki export” attachment. The wiki will be attached to the mail
Page break
There will be a page break between each article in the exported document.
It is also possible to manually insert page breaks in specific places by using the thematic break markers --- or <hr>.
Confluence Exporter
This capability is provided by the Confluence wiki plugin, which you need to install. Please see Installing plugins.
You can export your Dataiku project’s wiki to a Confluence space.
How to set up
The login credentials to the Confluence service need to be set up. A Dataiku administrator can define a shared preset in Plugins > Installed > Confluence wiki > Settings > Confluence login and make it available to relevant users/groups. Depending on your permissions, you can also define the preset at project level or inline when running the macro.
For online Confluence instances, you will need to first create an API token. To do so, go to your Profile > Manage your account > Security > Create and manage API tokens > Create API token. Copy the created token and paste it into the API token box of your Dataiku preset.
Fill in the Confluence Space key in your Dataiku preset. If the target space already exists, the wiki will be exported to it. If it does not exist, Dataiku will attempt to create it (requires sufficient Confluence permissions).
The DSS URL needs to be filled in. Go to Administration > Settings > Notifications & Integrations > DSS Location and make sure that the DSS URL is set up.
How to use
Navigate to the Dataiku project containing the wiki pages to push to Confluence. If you don’t see this macro, contact your Dataiku administrator because execution depends on plugin macro permissions. Once in the project, click on Macros > Wiki Confluence export. Select the preset corresponding to the Confluence Space you are targeting, and press Run Macro.
Known Issues
All code must be inside a code block. Any HTML tag present outside a code block is likely to make the page transfer fail.
Compliance to HTML and Markdown standards is more stringent on Confluence than on DSS wiki. Some HTML code might result in a functional wiki page on Dataiku but may be refused on Confluence. If that’s the case, an error message will appear in place of the wiki page. It’s up to you to go back to the DSS wiki page and fix the issue there before attempting another transfer.
Discrepancies between the Dataiku wiki and the uploaded Confluence version can appear when blocks are not properly separated by a line.
URLs are directly clickable in the Dataiku wiki, but are not with Confluence, unless they were properly tagged in Markdown using the
[title](url)scheme.