
Agent Evaluation
Agents are designed to execute precise workflows to generate domain-specific answers, which makes the challenge of measuring agent performance significantly more complex than traditional evaluation techniques. Evaluating an agent requires a multidimensional assessment of its decision-making, taking into account both the agent’s answer and the path the agent took to create that answer.
Dataiku offers an “Evaluate Agent” recipe for transactional agents: single-turn agents that process one request at a time. The recipe evaluates both the agent’s answer and its trajectory (tool calls and encountered guardrails) to generate various outputs, the most pivotal of which is an agent evaluation stored in an evaluation store. From this evaluation store, you can then complete your GenAIOps actions with alerting or automated actions.
Note
The “Evaluate Agent” recipe is available to customers with the Advanced LLM Mesh add-on.
Overview
Much like the Evaluate LLM recipe, the Evaluate Agent recipe does not take a model as a direct input, but a single dataset — the output of your pipeline containing all the required columns: input, output, tool calls, ground truth, etc…
When run, the recipe computes a set of metrics based on the content of the input dataset and create a single agent evaluation.
Note
Our agent evaluation tutorial provides a step-by-step explanation of how to create your first agent evaluation Flow. Do not hesitate to do it as a first experience.
There are some pre-requisites for a working recipe. Those requirements are to be done once, but may require the assistance of your instance administrator.
You need to have a code environment with the required preset installed (using Python 3.9+). Look for the preset called “Agent and LLM Evaluation”.
For most metrics, you will need an LLM to compute embeddings and an LLM for generic completion queries. These LLMs are to be selected from Dataiku’s LLM Mesh.
Recipe configuration
You can create an “Evaluate Agent” recipe from any dataset.
Input dataset
The input dataset must contain a record of all the interactions with the agent. Ground truth might also be needed by some metrics. If the input dataset was created by a Prompt recipe, you can set the Input Dataset Format to “Prompt Recipe”, and only have to fill the Ground truth and Reference tool calls fields. If the input dataset is an agent interaction logging dataset, you can set the Input Dataset Format to “Agent Interaction Logs”, and only have to fill the Ground truth and Reference tool calls fields. Otherwise, you can set the Input Dataset Format to “Custom”, and reference all the columns from the Input Dataset:
Input column: The column containing the input sent to the agent. Usually, a question or request from the user.
Output column: The textual answer sent back by the agent.
Actual tool calls column: The list of tools used by the agent. Must be an array of tool names as strings.
Ground truth column: The reference textual answer that was expected. Will be compared against the Output column.
Reference tool calls column: The reference list of used tools that was expected. Must be an array of tool names as strings. Will be compared against the Actual tool calls column.
Outputs
The outputs of the recipe are settable from the Input/Output tab. Like the Standalone Evaluation Recipe and the Evaluate LLM recipe, the Evaluate Agent recipe can output:
An Output Dataset: Will contain a copy of the Input Dataset, with one additional column for each of the metrics computed. The metric values are hence “row-by-row”: Each value is specific to that row.
A Metrics Dataset: Will contain one row for each run of the recipe, and one column for each of the metric computed. Each metric value is hence an aggregation of the values of this metric over all the rows. The aggregation is usually an average, but this can depend from one metric to another.
A GenAI Evaluation Store: Will contain a collection of agent evaluations (one for each run), each agent evaluation containing all of the above information: values from the input dataset, row-by-row metrics, aggregated metrics.
Some of the agent evaluation settings can be set from the recipe, to help you name and label each run.
Metrics
The metrics section contains a list of built-in metrics that you can select to evaluate the behavior of your agent. These metrics should cover basic needs:
Fine-grained deterministic checks on the tools used by the agent (In order and Out of order tool calls metrics).
LLM-as-a-judge metrics, based on the RAGAS framework.
Or deterministic BERTScore metric, which uses embeddings to compare outputs.
Custom Metrics
As agent evaluation is a quickly evolving topic, the recipe allows you to write your own metric in Python. This is done using a standard “evaluate” function and should return at least one float representing the metric.
Additionally, you can return an array of floats, each entry being the metric value for a single row. This will be used in the row-by-row analysis.
Code samples are available, which can make your first experience with custom metrics easier, or allow you to define your own samples to be reused later.
Custom Traits
In addition to writing custom metrics with code, you can also define custom LLM-as-a-judge metrics without code in the form of traits.
You define a trait by providing a list of pass/fail assertions, which will be applied to individual rows in your input dataset. For each row, the LLM defined in “Completion LLM” will run each assertion over its values. If all assertions for that row are correct, the value of the trait for that row will be “True”.
Each trait is a list of assertions, which are sent along with each row of your input dataset, to the LLM defined in “Completion LLM”. Each assertion is made on the values of the row. For each row, if all the assertions are correct, the LLM is expected to set the value of the trait to “True”. The aggregated value of the trait over all the rows is the fraction of rows having returned True.
As for custom metrics, trait samples are available, which can allow you to set and reuse traits.
Agent Evaluations
Each run of the “Evaluate agent” recipe will create one agent evaluation. This agent evaluation will be visible in the output evaluation store.
In the main view of an agent evaluation, you see plotted metric graphics at the top and the list of agent evaluations at the bottom, including metadata, labels, and metrics in a table.
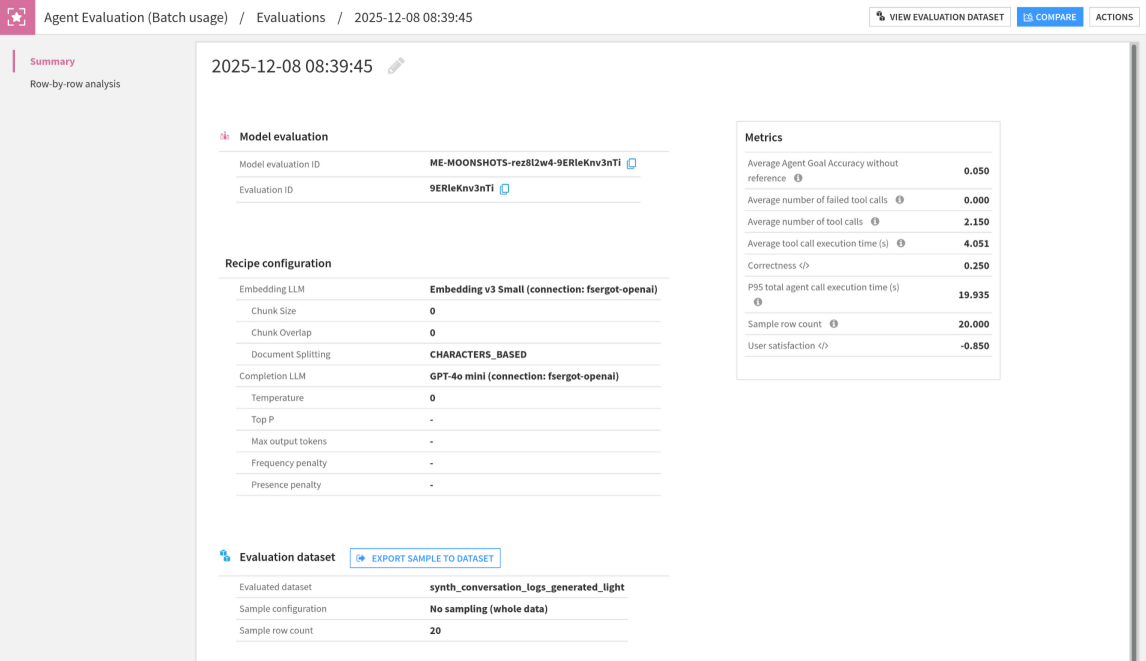
When you open an agent evaluation, the first section contains: run info, the recipe configuration at the time of the run, and all metrics. You also see the labels that were added during the execution of the recipe. You can add, update or delete labels if you want.
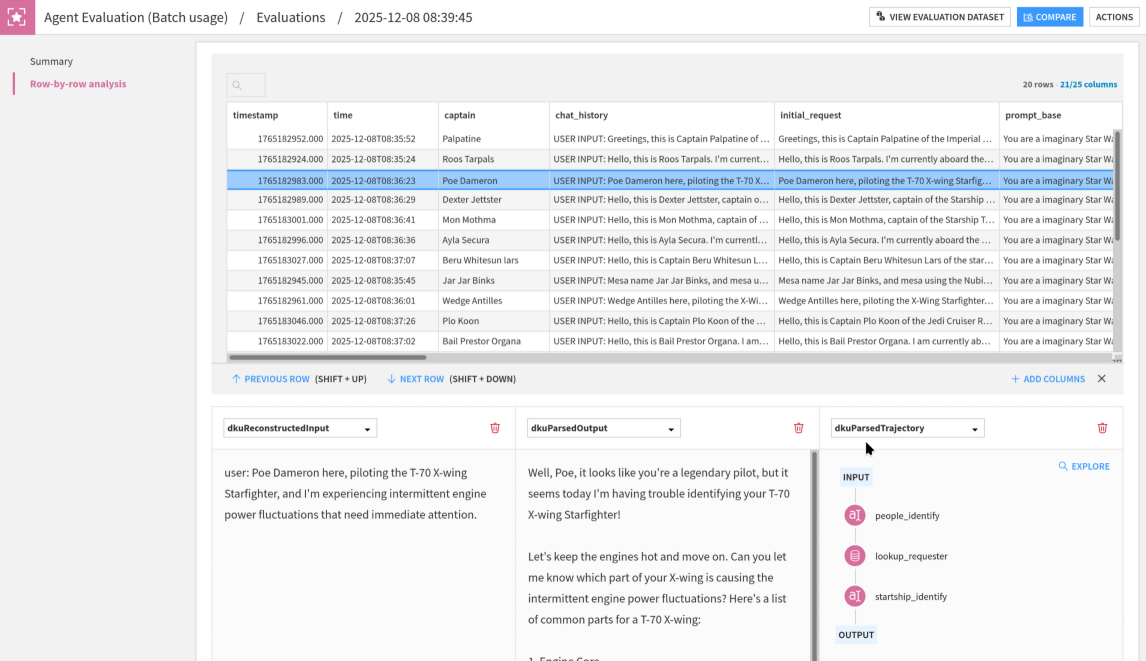
The second section of an agent evaluation is a row-by-row detail. This aims at helping you understand specific values of metrics, by giving you the context (row values) that precluded the value of each metric. Moreover, from each row, you can access the trajectory explorer, which gives an overview of the actions of the agent.
If you have defined custom metrics or custom traits, they will be shown in the agent evaluation summary along other metrics. If your custom metric returned the array with detailed values, you will also see it in the row-by-row analysis.
Trajectory explorer
The trajectory explorer displays an overview of what the agent did in chronological order, for each row in the input dataset.
The left panel contain a list of all the actions the agent took, as nodes. They can be of four types:
Initial input: The request sent to the agent.
Tool call: Any tool call the orchestrator requested, that was subsequently executed by DSS. Each tool call stores its input parameters and outputs (or eventual error).
Guardrail trigger: If guardrails are defined at the agent or orchestrator LLM level, they might not interrupt the agent. Nevertheless, any hit guardrail is presented here, as it can have altered (e.g by redacting) the input or output. Each guardrail stores its input (what was checked), and output (why the guardrail triggered).
Final output: The answer sent back by the agent.
You can click on each action to display its properties on the right panel. This includes, in addition to the input/output mentioned above, metadata such as timing information, or descriptions.
Comparisons
This row-by-row view is very practical to analyze specific cases in a run. However, when building a complex GenAI pipeline, you will probably experiment with different agent, different prompts, different pre- or post- processing. In such a case, the goal is not to analyze, but to compare runs using potentially very different pipelines.
Comparing runs is using model comparisons. As a specific addition to the standard model comparison, the agent Comparison has a section allowing you to perform side-by-side view for each row.
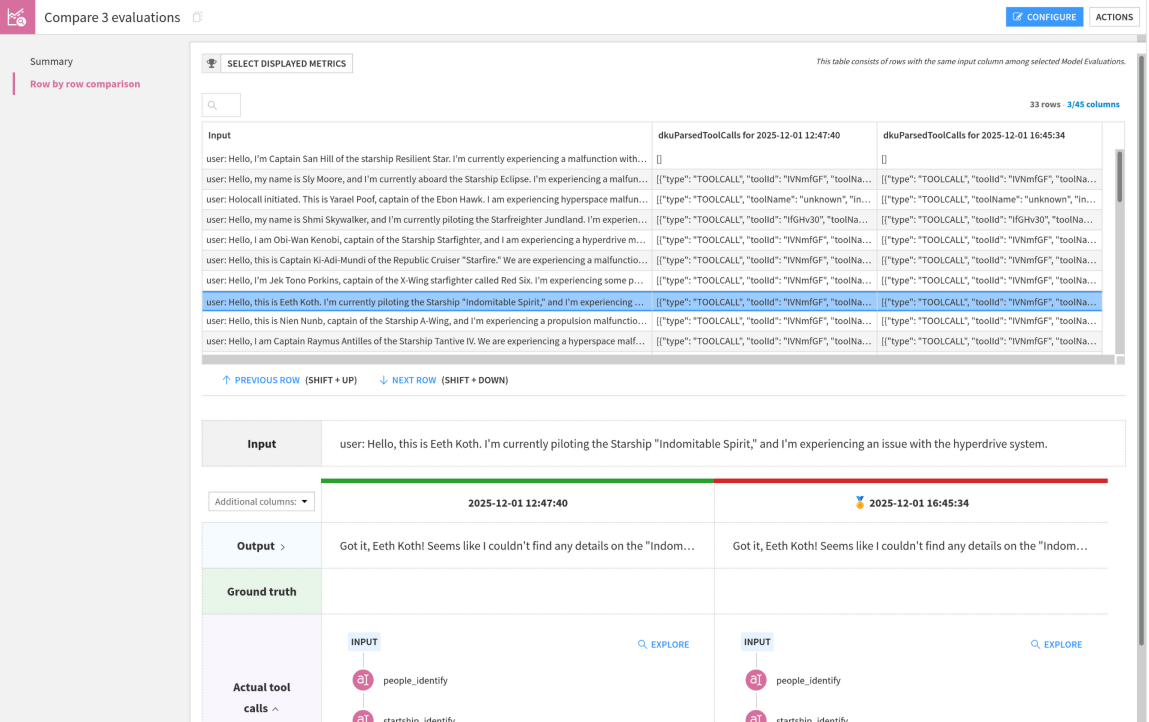
In this screen, you can select a row, and you will see outputs of each run. This allows you, for example, to spot a line where the agent goal accuracy is vastly different between two runs and analyze it in depth to make an informed decision about which version of your pipeline is best.